
Sea Buck thorn berries Harvest & Preserves
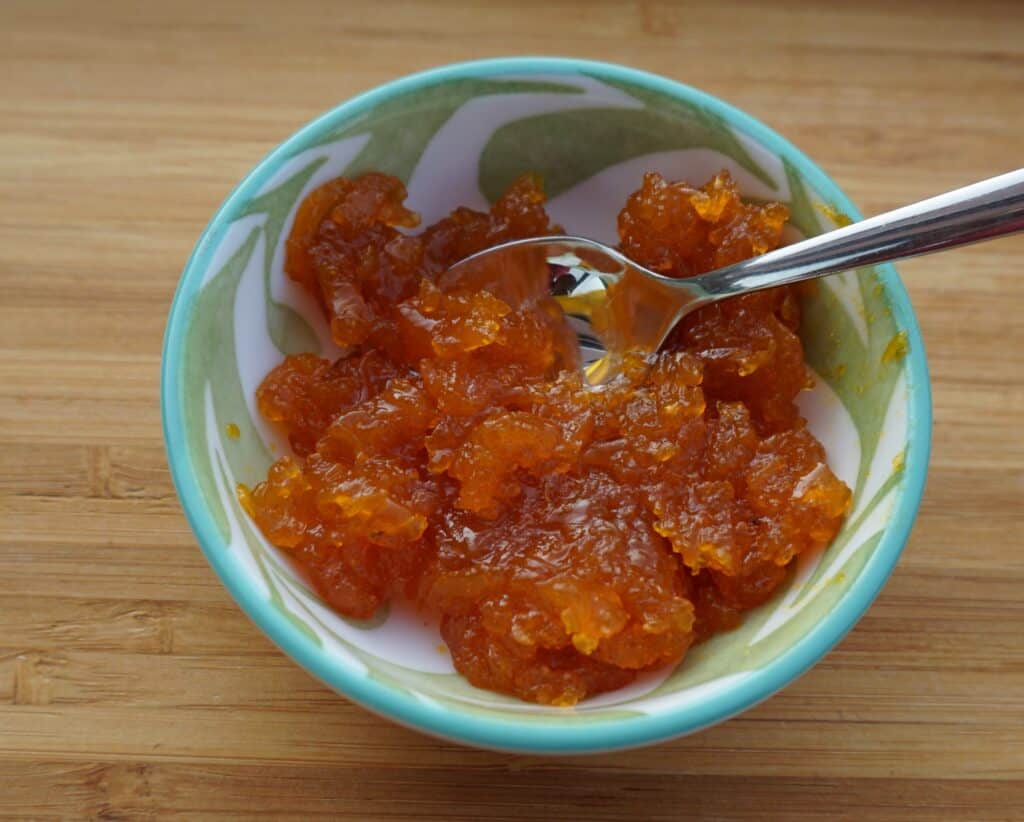
Sea Buckthorn Berries Harvest & Preserves Ingredients Cooking Instructions Jump to Recipe September was a busy time for us in preparing for the winter planting after the summer holiday break and harvest season of Fall Garden . Sea buck thorn berries was one of the first on the list of September harvests in addition to some butternut squash and the remaining summer vegetables. As a result of the good harvest we had, I had to find a quick way to preserve them. Due to lack of time we decided to make them into jams. I will get to that in the second half of this blog post. Table of Contents What are Sea Buckthorn Berries? These berries are also called as Sandthorn or Sallowthorn. The German word is Sanddorn. These common shrubs have dense and stiff branches and are very thorny. The leaves on these shrubs are a distinct pale silvery-green color. “The buckthorn berry plants are dioecious with separate male and female plants. The males produce brownish flowers which produce wind distributed pollen to the female plants. The female plants as a result of the pollination produce orange berries which are oval and are about 6 -9 mm in diameter. The sea buck thorn berries are soft, juicy and rich in oils.” More information about the sea buckthorn berries and shrubs can be found in https://en.wikipedia.org/wiki/Hippophae Harvesting TipsFor harvesting the berries you will need a good pair of thick gardening gloves as the branches are laden with thick and sharp thorns and a good pair of very sharp shrub cutter. Cut the branches with the berries. Then carefully pick the berries from the branches for use. Uses of Sandthorn BerriesThese berries are made into jams, teas, liquors and cosmetics. I have personally bought hand creams, and body lotions made out of sandthorn berries. Because I had very little time to try out other ways to preserve these berries, I choose to go for the easiest and fool proof option. I made a jam out of it. The jam would make an ideal Christmas present since I love giving gifts made personally by me. Check out also my post on Top 10 Sea Buckthorn Recipes. How to make Sea Buckthorn Berry Jam? Ingredients List 1000g of Buckthorn berries 500g of pectin sugar 75 ml of water. Clean sterilized glass jars Cooking Instructions Add the water to the berries and cook the berries till soft and the skin starts to crack. Mash the berries using a sieve or a food mill. You can also use the puree attachment of your mixer. Add the sugar to the fruit puree and cook it down to thicken the jelly. This takes about 20 min. To test if its ready for bottling , drop a few drops on to a plate and tilt it. If the jelly is still flowing when the plate is tilted, therefore its not yet ready for the bottling process. Repeat this process till the jelly stops flowing and fill into sterilized jars immediately. Close the lids tightly. Watch the Video Recipe Card Sea Buckthorn Berries Jam Servings 50 servingsPrep time 60 minutesCooking time 20 minutes Ingredients 1000g of Buckthorn berries 500g of pectin sugar 75ml of water Clean sterilized glass jars Directions Add the water to the berries and cook the berries till soft and the skin starts to crack. Mash the berries using a sieve or a food mill. You can also use the puree attachment of your mixer. Add the sugar to the fruit puree and cook it down to thicken the jelly. This takes about 20 min. To test if its ready for bottling , drop a few drops on to a plate and tilt it. If the jelly is still flowing when the plate is tilted, therefore its not yet ready for the bottling process. Repeat this process till the jelly stops flowing and fill into sterilized jars immediately. Close the lids tightly. Frequently Asked Questions Accordion Tab Title 1 Click edit button to change this text. Lorem ipsum dolor sit amet, consectetur adipiscing elit. Ut elit tellus, luctus nec ullamcorper mattis, pulvinar dapibus leo. Accordion Tab Title 2 Click edit button to change this text. Lorem ipsum dolor sit amet, consectetur adipiscing elit. Ut elit tellus, luctus nec ullamcorper mattis, pulvinar dapibus leo. Accordion Tab Title 3 Click edit button to change this text. Lorem ipsum dolor sit amet, consectetur adipiscing elit. Ut elit tellus, luctus nec ullamcorper mattis, pulvinar dapibus leo. Leave a ReplyPlease enable JavaScript in your browser to complete this form.Name *Email *Website / URLMessageCheckboxes Yes, add me to your mailing list. Submit Popular Recipes Subscribe Signup for our NewsletterUnlock a world of flavor, creativity, and green living. Subscribe for exclusive recipes, DIY tutorials, and gardening advice.Please enable JavaScript in your browser to complete this form.Name *Email * Submit Popular Recipes
Swiss Organic Fall Garden 2018
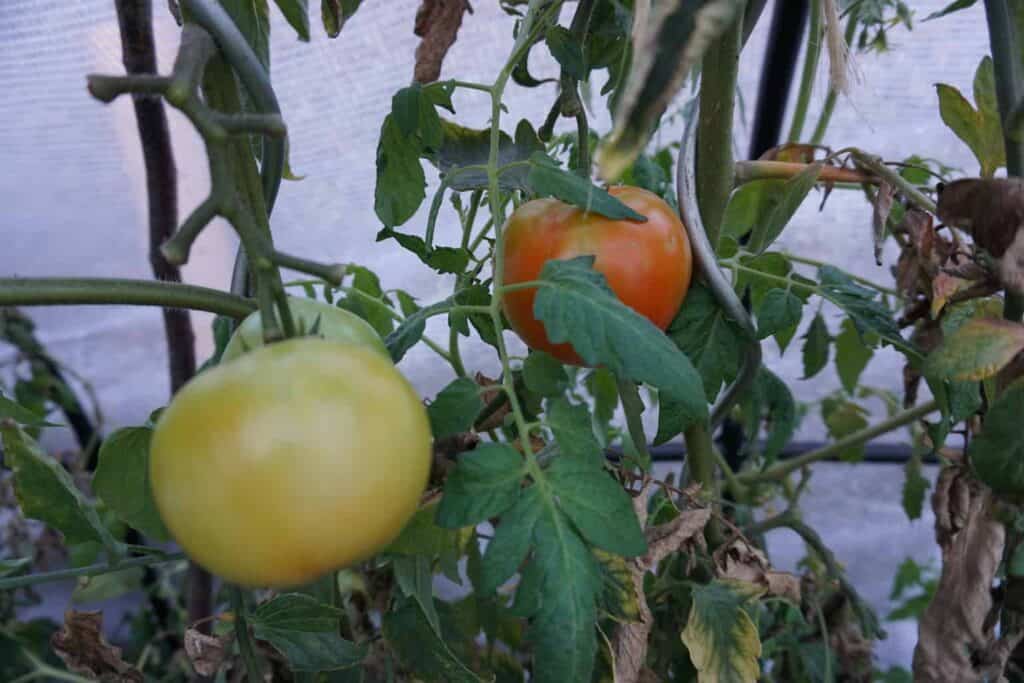
Swiss Organic Fall Garden Update For the past two weeks, day and night temperatures have been dropping at our Swiss Organic fall garden. We are now seeing the beginning of fall with temperatures dropping as low as 3 degrees centigrade. Our organic fall garden looks a lot different after getting used to an almost tropical weather these past few weeks.
Quick and Easy Apple Pie Recipe
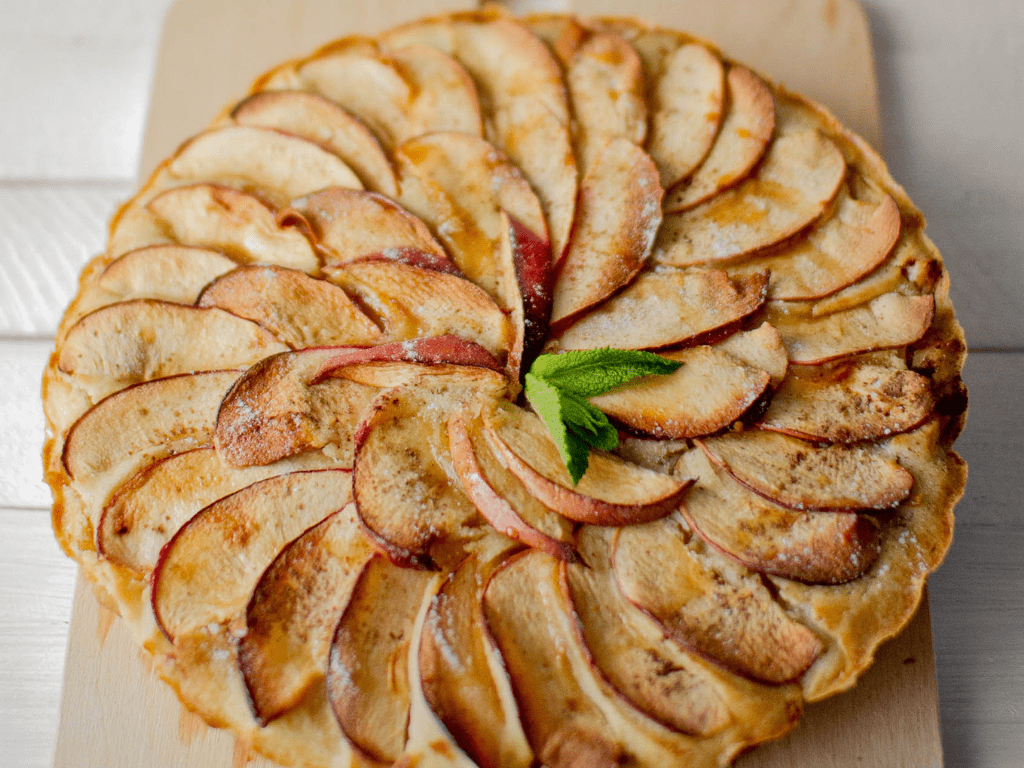
Quick and Easy Apple Pie Recipe Ingredients Cooking Instructions Jump to Recipe Apple pie is a hot favorite with my little daughter therefore its made more often than other sweet bakes here at Swiss home. I learnt this recipe from a good friend of mine and have been baking it ever since. This Quick and Easy Apple Pie Recipe is low on sugar since the sweetness depends on the apple variety you use. During autumn we have an abundance of apples therefore a nice alternative dessert for those cooler days. For more ideas on apple recipes you can make Apple sauce to store for longer periods. Table of Contents Uncomplicated and Easy Apple Pie recipe Since you are going to be baking the apples anyway, you don’t need to use the pretty ones. Therefore, cooking apples will do. In this recipe I have used a store bought spelt pastry dough for just pure convenience.I make this apple pie often because its so easy to put together without much planning or ingredients. In case you don’t have access to this pastry dough, I will also leave the recipe for making your own pastry dough too. What apples are suitable for Apple pie I generally tend to use Gala or Elstar which is easily available here in Switzerland. The most popular cooking apples include, Braeburn, Gala, Cortland, Bramley, Empire, Northern Spy, Granny Smith and McIntosh. You can add flavors like vanilla or cinnamon powder in the sugar mixture. I just alternate between the two flavors. An ideal way to serve apple pie is with custard or fresh cream. Because, I don’t want to add more sugar than necessary for the occasional diet, I skip those extras. Tools you will need Pie Dish measuring 26 cms Rolling Pin Ingredients List Ingredients for the Pastry dough 150 gm Flour 1/4 teaspoon salt 50 gm cold butter cut into cubes 75 ml of water Ingredients for the filling 4-5 Apples of your choice 6 tablespoons of ground almond 4 tablespoons of brown mascavado sugar or any brown unrefined sugar 25 ml of fresh cream. (if you need more you can add more, but the pie will take longer to bake) 1/4 tsp of vanilla powder Variation Rather than making the dough yourself you can also buy a good quality store bought pastry dough and let it rest out of the refrigerator for about 20 minutes before assembling. This makes the dough more pliable and easy to handle. Cooking Instructions For the Pastry dough Mix the flour and salt and set it aside. Add in the butter cubes and mix the flour to a biscuit crumb like texture Add the water and quickly form into to a dough without kneading. Flatten it and set it for about 30 min into the refrigerator for cooling. Roll the pastry dough into a 3 mm thickness to around 28-30 cm depending on your baking pan. For the filling Place the rolled pastry base into a baking pan or pie dish. Prick the dough with a fork randomly. This will help the base to stay in place instead of rising. Mix the ground almond and sugar with the vanilla powder. Sprinkle half the quantity to the base and save up half of it for the topping. Slice the apples into thin slices and arrange them around the pie neatly. (I used an apple slicer as a result I got really thin even slices) Mix the cream with the remaining ground almond and sugar mixture. Dribble it on the apples randomly. Bake for 30 min in a preheated oven at 200 deg centigrade fan. Check to see if it browns too quickly by 20 min. and reduce the heat to 180 deg. and bake further for 10-12 min. Frequently Asked Questions Accordion Tab Title 1 Click edit button to change this text. Lorem ipsum dolor sit amet, consectetur adipiscing elit. Ut elit tellus, luctus nec ullamcorper mattis, pulvinar dapibus leo. Accordion Tab Title 2 Click edit button to change this text. Lorem ipsum dolor sit amet, consectetur adipiscing elit. Ut elit tellus, luctus nec ullamcorper mattis, pulvinar dapibus leo. Accordion Tab Title 3 Click edit button to change this text. Lorem ipsum dolor sit amet, consectetur adipiscing elit. Ut elit tellus, luctus nec ullamcorper mattis, pulvinar dapibus leo. Watch the Video Recipe Card Pin Print Quick and Easy Apple Pie Recipe Servings 8 servingsPrep time 45 minutesCooking time 30 minutes Apple pie is a hot favorite with my little daughter therefore its made more often than other sweet bakes here at Swiss home. I learnt this recipe from a good friend of mine and have been baking it ever since. This Quick and Easy Apple Pie Recipe is low on sugar since the sweetness depends on the apple variety you use. Ingredients Ingredients for the Pastry dough 150 gm Flour 1/4 teaspoon salt 50 gm cold butter cut into cubes 75 ml of water Ingredients for the filling 4-5 Apples of your choice 6 tablespoons of ground almond 4 tablespoons of brown mascavado sugar or any brown unrefined sugar 25 ml of fresh cream. (if you need more you can add more, but the pie will take longer to bake) 1/4 tsp of vanilla powder Instructions Place the rolled pastry base into a baking pan. Prick the dough with a fork randomly. This will help the base to stay in place instead of rising. Mix the ground almond and sugar with the vanilla powder. Sprinkle half the quantity to the base and save up half of it for the topping. Slice the apples into thin slices and arrange them around the pie neatly. (I used an apple slicer as a result I got really thin even slices) Mix the cream with the remaining ground almond and sugar mixture. Dribble it on the apples randomly. Bake for 30 min in a preheated oven at 200°C fan. Check to see if it browns too quickly by 20 min. and reduce the
Summer Garden Late August 2018
Late Summer Garden Summer Garden is what he have a lot to write about, yet I will post mostly pictures . A lot has happened since my last blog post on our garden.
Permaculture in Swiss Alps

Our visit to Schweiben Alp Permaculture Community Permaculture way of gardening has been at the heart of our gardening experiments.We are often adapting this technique as I mentioned in Organic vegetable harvest. We decided to visit Schwaibenalp Permaculture community again this year. Europe was experiencing a heat wave between July and august. We wanted a reprieve from this heat for at least a couple of days. So what better than to combine a yoga seminar, cool alpine climate and wonderful nature at the same time.
Pasta free Vegetarian Lasagna
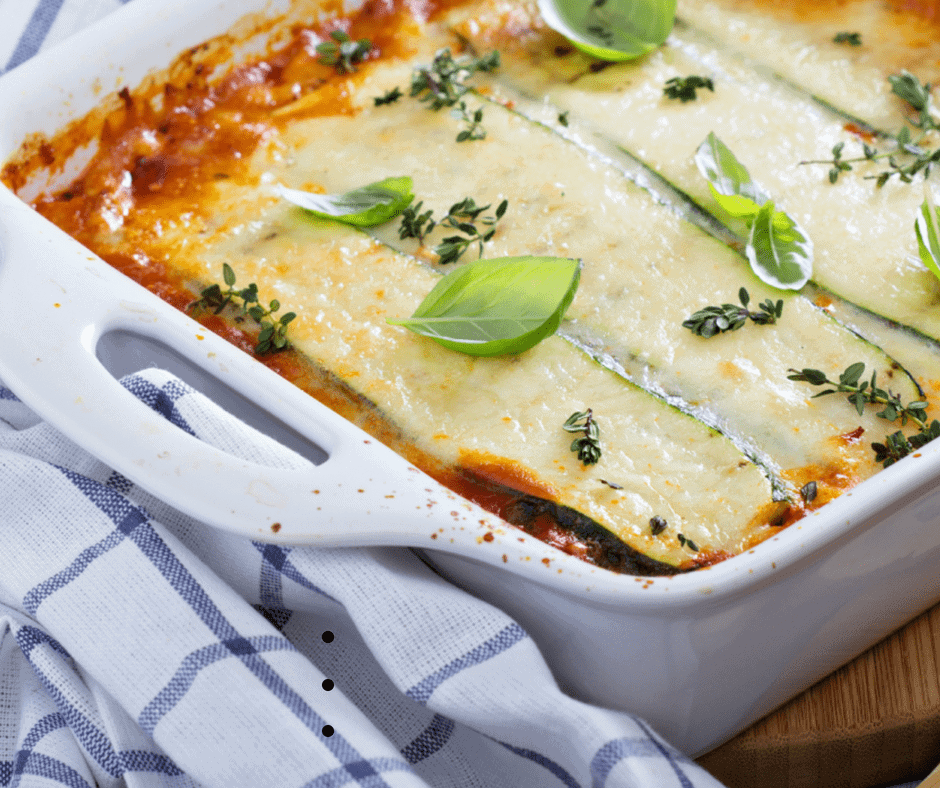
Pasta-free Vegetarian Lasagna Ingredients Cooking Instructions Jump to Recipe Pasta-free Vegetarian Lasagna sounds strange yet it works. Therefore, I am excited to share this recipe. I created this out of a need to use those over sized zucchinis from our garden. Rather than just bake them or cook them as usual. Lasagna is one of our favorites here at home. You can take a look at my previous post Organic vegetable harvest . Where in I mentioned about these over sized zucchinis. After much researching around the internet for something new. I came across different ideas but most were with either meat, soya or eggs just not suitable for us. Above all none of them fit our dietary needs, so I ended up tweaking my regular recipe yet again. I was first introduced to Lasagna after following a great recipe from the famous Australian Chef Kurma about 20 years ago when a friend of mine gifted me this book. Great vegetarian dishes.I have never looked back ever since. My knowledge of different cuisines has widened because of it. Since then I have made many interesting and tasty dishes from this book. Furthermore, I wanted my daughter to eat more vegetables other than just picking up the pasta with the cheese only. This was a clever way to disguise the vegetables. Table of Contents Ingredients List Ingredients for the Filling 2 big Aubergines chopped into cubes 3 Bell peppers any colour chopped into cubes 2 Tins of chopped tomatoes 3 cloves of Garlic peeled and cut into small pieces. 2 Mozzarella cheese ( 125 gm each) shredded or cut into small pieces A handful of Kalamata Greek olives, pitted and cut into rings. 50 gm of hard cheese ( cheddar or Gruyere or some other variety) 5-6 Basil leaves fresh ( you can also use dried herbs ) 1 teaspoon freshly ground pepper 2 teaspoons Himalaya pink salt 1/2 tsp of Oregano, 1/2 tsp Marjoram and 1/4 of Thyme a pinch of Asafoetida 5-6 tbsp. of olive oil Ingredients for the Bechamel sauce 50 gm of melted unsalted butter 100 gm of spelt flour 250 ml of whole milk a pinch of ground nutmeg 1/2 tsp of ground black pepper Cooking Instructions For The Filling Heat a heavy bottom pot to medium heat. And add in the olive oil. Due to the fact that cast iron can retain and distribute heat evenly I use them often. Add in the asafoetida into the warm oil and the freshly cut garlic pods. Saute it shortly and then add in the chopped aubergines. Its best to cut the aubergines before mixing because they turn black very quickly. Cook the aubergines shortly and then add in the chopped bell peppers. Cover the pot and cook the vegetables until soft before adding the tinned tomatoes. Give it a quick stir and cook all the vegetables. Add the dried herbs followed by the fresh basil leaves and the chopped olives. Crush the pepper directly to the pot and add in the salt. Give it a good stir and set it aside. For the Béchamel Sauce Melt the butter in a heavy bottom pot. Warm the milk and set it aside. Fry the flour and add in the ground nutmeg and black pepper. When the flour is slightly brown mix in the warm milk and beat it vigorously till it reaches a smooth consistency. Now your Bechamel sauce is ready. Assembling Lasagna Peel the Zucchinis and slice them into 1/2 cm thickness like Pasta sheets. In a deep baking dish arrange all the zucchini sheets at the bottom. Spread in the filling evenly and sprinkle 1/3 of the grated cheese on it. Repeat the process in the same order until you use up all the filling and the zucchini. Pour in the bechamel sauce and sprinkle the remaining cheese. Bake the Lasagna in a preheated oven at 200 deg. centigrade for 45 minutes until the top is browned. Let it set before serving. Your Pasta free vegetarian Lasagna is now ready to be plated up and enjoyed. Serve with fresh green salad of your choice. Since I had no fresh greens growing at that point in my garden. I served mine with Guacamole. You can find the recipe for the guacamole in the Recipe page. Further more, I have to admit that this recipe was a hit with my daughter and her friends. Because these kids were usually vegetable shy like most kids. Seems like they enjoyed it. Watch the Video Recipe Card Pasta free Vegetarian Lasagna Servings 6 servingsPrep time 75 minutesCooking time 45 minutes Ingredients 2 big Aubergines chopped into cubes 3 Bell peppers any colour chopped into cubes 2 Tins of chopped tomatoes 3 cloves of Garlic peeled and cut into small pieces. 2 Mozzarella cheese ( 125 gm each) shredded or cut into small pieces A handful of Kalamata Greek olives, pitted and cut into rings. 50 gm of hard cheese ( cheddar or Gruyere or some other variety) 5-6 Basil leaves fresh ( you can also use dried herbs ) 1 teaspoon freshly ground pepper 2 teaspoons Himalaya pink salt 1/2 tsp of Oregano, 1/2 tsp Marjoram and 1/4 of Thyme a pinch of Asafoetida 5-6 tbsp. of olive oil Ingredients for the Béchamel sauce 50 gm of melted unsalted butter 100 gm of spelt flour 250 ml of whole milk a pinch of ground nutmeg 1/2 tsp of ground black pepper Directions Filling Heat a heavy bottom pot to medium heat. And add in the olive oil. Due to the fact that cast iron can retain and distribute heat evenly I use them often. Add in the asafoetida into the warm oil and the freshly cut garlic pods. Saute it shortly and then add in the chopped aubergines. Its best to cut the aubergines before mixing because they turn black very quickly. Cook the aubergines shortly and then add in the chopped bell peppers. Cover
3 Ways to Preserve Tomatoes
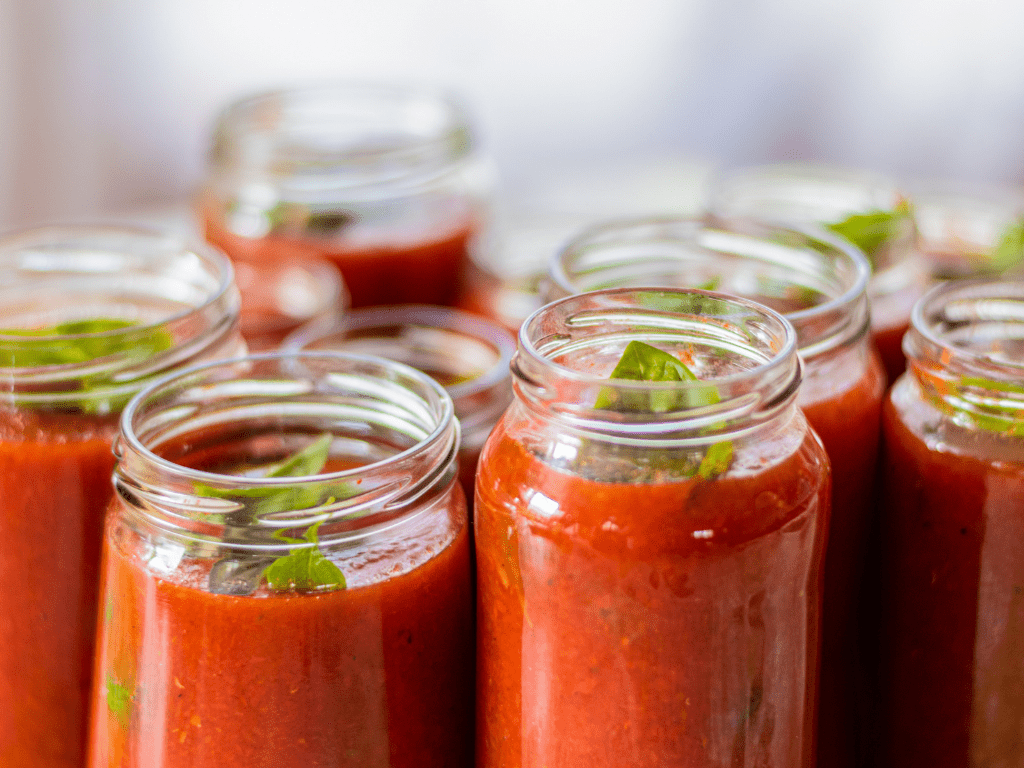
3 Ways to Preserve Tomatoes Ingredients Cooking Instructions Jump to Recipe Tomatoes in ripening from the summer heat and sunlight are the sweetest and best. Enjoy your summer harvest longer using these 3 ways to preserve tomatoes. We had a really good harvest of tomatoes from our Organic vegetable harvest this year because of the green house and a really warm summer so far. We cannot use them all up so quickly at once due to the sheer volume of our produce. Even as I am writing about the star of our produce this year they are growing and ripening on the plants. They taste the best in summer and when you grow them yourself you have a better control on when best to harvest them. Its good to let them ripen a little on the plants itself before harvesting them. This way they taste the best and sweet too. I had to find different ways of preserving summer tomatoes to make it last longer till the next season. There are other ways to do it too. I am writing about the 3 easy ways to preserve summer tomatoes at home easily. You can look up in this site for more information. https://anrcatalog.ucanr.edu/pdf/8116.pdf Table of Contents Ingredients List Tomatoes Instructions 1. FreezeThis was a trick my aunt used to do. Pick good tomatoes which are ripe yet firm. Wash and dry them and pack it into Ziploc bags.These tomatoes are good for soups but cannot be used for salads. I still have a couple of frozen tomatoes from last year in my freezer. I used them up for small soups till now.This is probably not effective if you have constant power cuts and not enough freezer space. Hence the 2nd method is probably for you. 2. CanningThis is an age old way of preserving any fresh produce to make it last longer. There are many advantages to canning your fresh produce. By canning you can make your produce last throughout the year till the next season. Before the advent of globalization and refrigeration this was the way most people ate a variety of foods especially in colder climates. For a one time investment you can reuse the jars and avoid wastes and thereby save costs.https://www.ehow.com/list_7286825_advantages-canning-food_.html Method for canning summer tomatoes Boil a big pot of water and drop the tomatoes gently into it. This process is called Blanching which helps to peel the skin of the tomatoes easily. While the tomatoes are cooking sterilize the glass jars. I used up cycled glass jars from previous sauces and condiments. These jars had already undergone a dishwasher cycle and I heated them in the oven at 100 deg. centigrade hot air. Sterilize the lids separately in hot water in a separate pot. Dry the lids thoroughly without any trace of moisture. Cook the tomatoes till it softens and the skin starts peeling off. Transfer them into a food mill and puree them. The food mill is useful for de -seeding and peeling the tomatoes and can used for other fruits and vegetables. Boil and thicken the tomato puree for about 30 minutes before transferring them into sterilized jars. Watch the Video Recipe Card Pin Print 3 Ways to Preserve Tomatoes Servings 4 servingsPrep time 30 minutesCooking time 40 minutesCalories 300 kcal Ingredients Tomatoes Methods Freeze This was a trick my aunt used to do. Pick good tomatoes which are ripe yet firm. Wash and dry them and pack it into Ziploc bags.These tomatoes are good for soups but cannot be used for salads. I still have a couple of frozen tomatoes from last year in my freezer. I used them up for small soups till now.This is probably not effective if you have constant power cuts and not enough freezer space. Hence the 2nd method is probably for you. CanningThis is an age old way of preserving any fresh produce to make it last longer. There are many advantages to canning your fresh produce. By canning you can make your produce last throughout the year till the next season. Before the advent of globalization and refrigeration this was the way most people ate a variety of foods especially in colder climates. For a one time investment you can reuse the jars and avoid wastes and thereby save costs. Method for canning summer tomatoes Boil a big pot of water and drop the tomatoes gently into it. This process is called Blanching which helps to peel the skin of the tomatoes easily. While the tomatoes are cooking sterilize the glass jars. I used up cycled glass jars from previous sauces and condiments. These jars had already undergone a dishwasher cycle and I heated them in the oven at 100 deg. centigrade hot air. Sterilize the lids separately in hot water in a separate pot. Dry the lids thoroughly without any trace of moisture. Cook the tomatoes till it softens and the skin starts peeling off. Transfer them into a food mill and puree them. The food mill is useful for de -seeding and peeling the tomatoes and can used for other fruits and vegetables. Boil and thicken the tomato puree for about 30 minutes before transferring them into sterilized jars. Fill the jars to the brim. Add about half a teaspoon of salt and 2 tablespoon or lemon juice before closing the jars. Wipe off any traces of the sauce around the rims with a kitchen paper towel. Open the jars slightly to release the pressure and close it back tightly again. Place all the jars into boiling water for about 10-15 minutes. You will hear and see the lids popping up which is a sign that the jars have sealed well. Making Sauces -another way to preserve summer tomatoes I made pizza sauces to use in case of emergency. Moreover tomatoes taste best during the summer months. Since last year I make some extra pizza sauces ready to use. Just a few jars not more. Scroll down for the printable
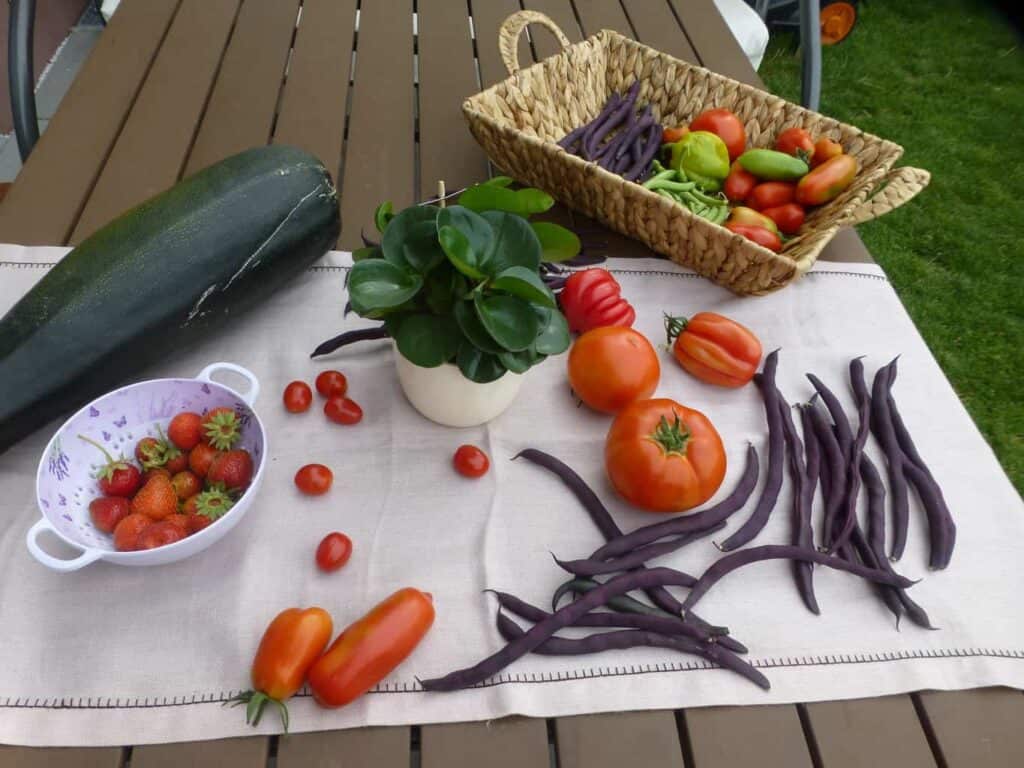
Organic Vegetable Harvest
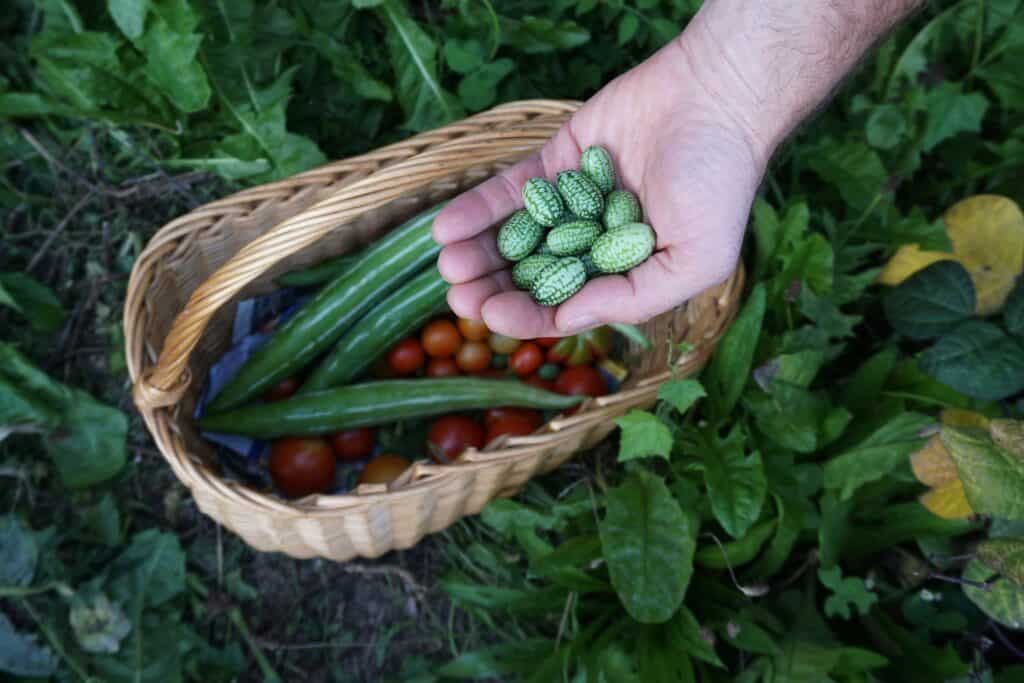
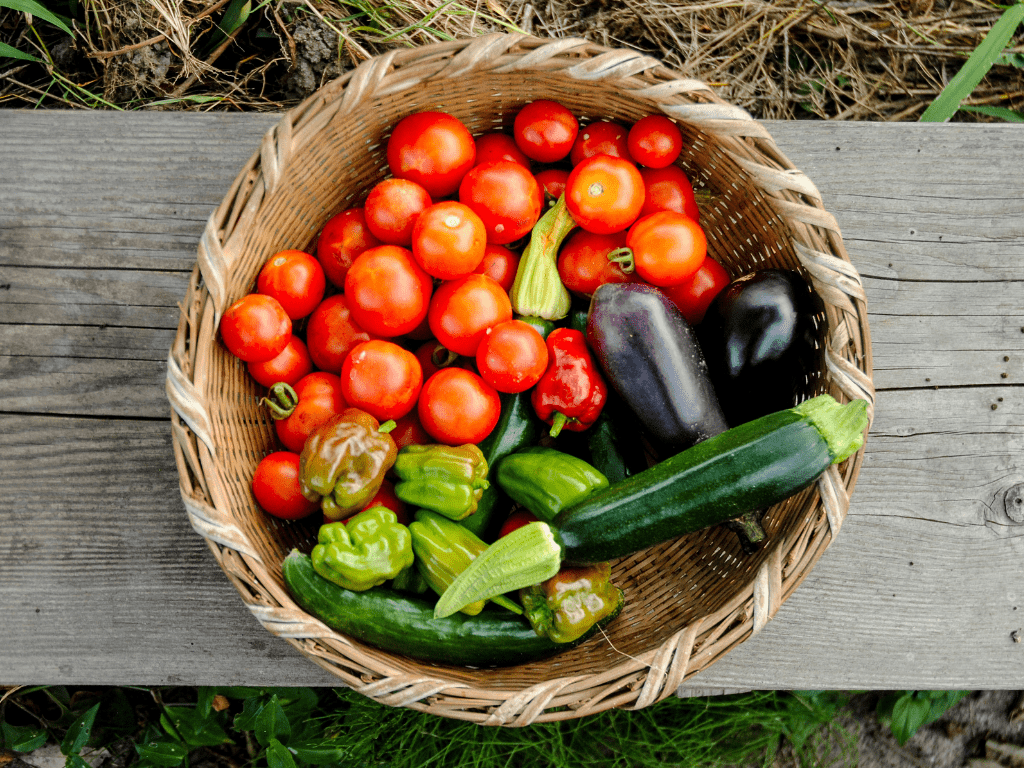
Organic Vegetable Harvest A lot of planning and effort has gone in to get a bountiful Organic Vegetable Harvest during June and July. My husband has been at it since autumn last year by planting some of the vegetables which would be ripe for this summer harvest. There is a lot of learning curve in store for us yet to enable us to get more productive in the coming years in order to have a more efficient and productive organic vegetable harvest for the future too. I will try to summarize as much as I can into this post.
How to make Sauerkraut at Home
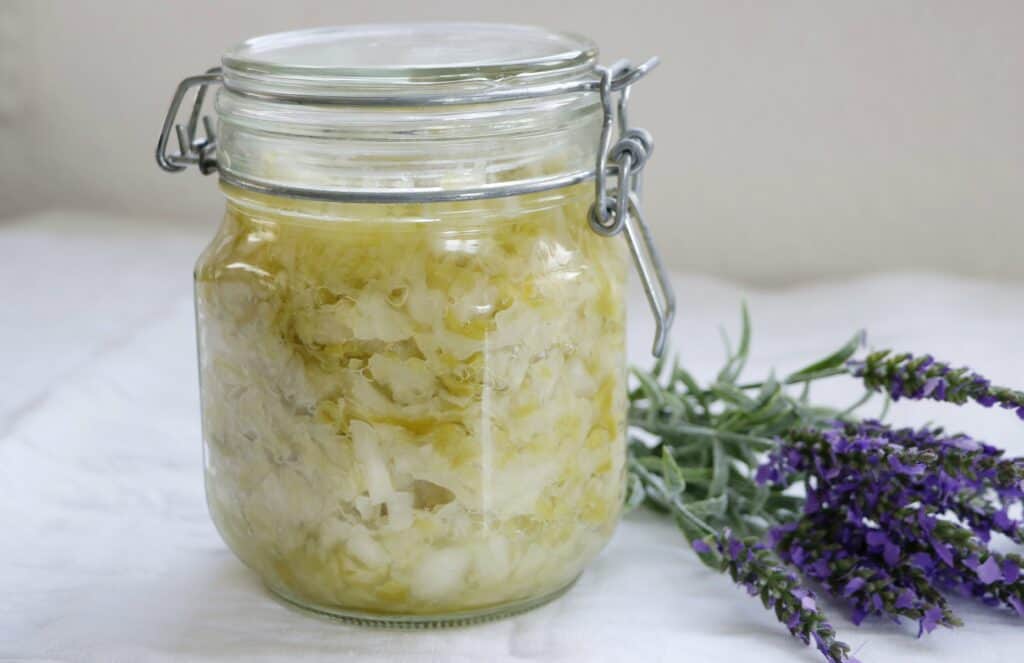
How to make Sauerkraut at Home Ingredients Cooking Instructions Jump to Recipe How to make Sauerkraut : A step by step process Since, we had a good harvest of the cabbages in July from our spring planting, I couldn’t always cook cabbages. So I had to find other ways to use the abundance of our garden produce. The best way to preserve this summer abundance for the winter would be by learning how to make Sauerkraut. My husband on the other hand is used to eating sauerkraut. He knew how to make it from his mother by watching her as a kid. My mother-in-law had a vegetable garden and those days they had no supermarkets which sold all year around fresh cabbages or other exotic foods. So what ever they harvested from the summer garden they use to preserve for winter. Table of Contents Health Benefits of Sauerkraut All my life I have been eating fermented food as the proof of it is in my gut. I have a healthy gut flora and digestion. Sauerkraut is a good source of pro- biotic , due to its fermentation is very important for your gut. The fiber and supply of pro-biotics improve digestion and promote the growth of healthy bowel flora, protecting against many diseases of the digestive tract. You can look up at the health benefits of eating fermented foods here, Health benefits of fermenting Ingredients List Recipe for 1 kg of cabbages This is what we came across out after much researching on the internet. You can tweak this recipe according to the amount of cabbage you have at hand. You can watch the video by clicking. Scroll down for the printable version of the recipe. White Cabbages after removing the outer leaves: 1 kg Himalaya pink salt ( best to use non-flouridated salt) : 10 gm Whole coriander: 1 teaspoon Whole black pepper: 1 teaspoon Cooking Instructions Halve the Cabbages and remove the outer leaves. Save up the leaves as you will need them later. Remove the hard stem from the center by quartering the cabbages. Grate them with a food processor or a hand grater. If you have not much quantity and just want to do 1 cabbage, you can cut them thinly too. In a large bowl add all the grated cabbages and add the salt and crush the cabbages to extract the juice. The cabbages will be preserved in its own juice. You don’t need to wash the cabbages, just remove out the outer leaves. As washing the cabbages can destroy the good bacteria. When the cabbages are crushed enough and its oozing with its juices. Add the spices and mix well. Fill the grated cabbages into sterilized dry glass jars. Cover the grated cabbages with the outer leaves you saved up earlier. Make sure that the cabbage is covered in its own juices. In case there isn’t enough, just add some boiled and cooled salt water to it. The cabbage, the outer leaves should be covered with the liquid. Add a sterilized stone or a small glass cup to fit into the jar and seal the jars. The stone helps in keeping the cabbages covered in the juices. Close the jars and keep it at room temperature for about 8 to 10 days and then transfer the jars to a cooler place like your cellar. Don’t open the jars at this stage. You can set the jars in a bowl as when the fermenting takes place the liquid may flow out of the jars. Recipe Card Pin Print How to make Sauerkraut at Home Servings 4 servingsPrep time 30 minutesCooking time 40 minutesCalories 300 kcal Ingredients 1 Kg white cabbages after removing the outer leaves 10 gm Himalaya pink salt ( best to use non-flouridated salt) 1 tsp whole coriander 1 tsp whole black pepper Directions Halve the Cabbages and remove the outer leaves. Save up the leaves as you will need them later. Remove the hard stem from the center by quartering the cabbages. Grate them with a food processor or a hand grater. If you have not much quantity and just want to do 1 cabbage, you can cut them thinly too. In a large bowl add all the grated cabbages and add the salt and crush the cabbages to extract the juice. The cabbages will be preserved in its own juice. You don’t need to wash the cabbages, just remove out the outer leaves. As washing the cabbages can destroy the good bacteria. When the cabbages are crushed enough and its oozing with its juices. Add the spices and mix well. Fill the grated cabbages into sterilized dry glass jars. Cover the grated cabbages with the outer leaves you saved up earlier. Make sure that the cabbage is covered in its own juices. In case there isn’t enough, just add some boiled and cooled salt water to it. The cabbage, the outer leaves should be covered with the liquid. Add a sterilized stone or a small glass cup to fit into the jar and seal the jars. The stone helps in keeping the cabbages covered in the juices. Close the jars and keep it at room temperature for about 8 to 10 days and then transfer the jars to a cooler place like your cellar. Don’t open the jars at this stage. You can set the jars in a bowl as when the fermenting takes place the liquid may flow out of the jars. Frequently Asked Questions Accordion Tab Title 1 Click edit button to change this text. Lorem ipsum dolor sit amet, consectetur adipiscing elit. Ut elit tellus, luctus nec ullamcorper mattis, pulvinar dapibus leo. Accordion Tab Title 2 Click edit button to change this text. Lorem ipsum dolor sit amet, consectetur adipiscing elit. Ut elit tellus, luctus nec ullamcorper mattis, pulvinar dapibus leo. Accordion Tab Title 3 Click edit button to change this text. Lorem ipsum dolor sit amet, consectetur adipiscing elit. Ut elit tellus, luctus nec ullamcorper mattis, pulvinar dapibus leo. Leave a ReplyPlease enable JavaScript in your
Organic Summer garden in July
Organic Summer garden in July Our efforts to have a very productive organic summer garden in July is paying off. Since gardening is very much dependent on many factors we are also learning from these mistakes. Moreover, every year is a little different, there is a lot of room for learning for us beginners who want to become self sufficient.