
Hot and Sweet Pepper Jelly
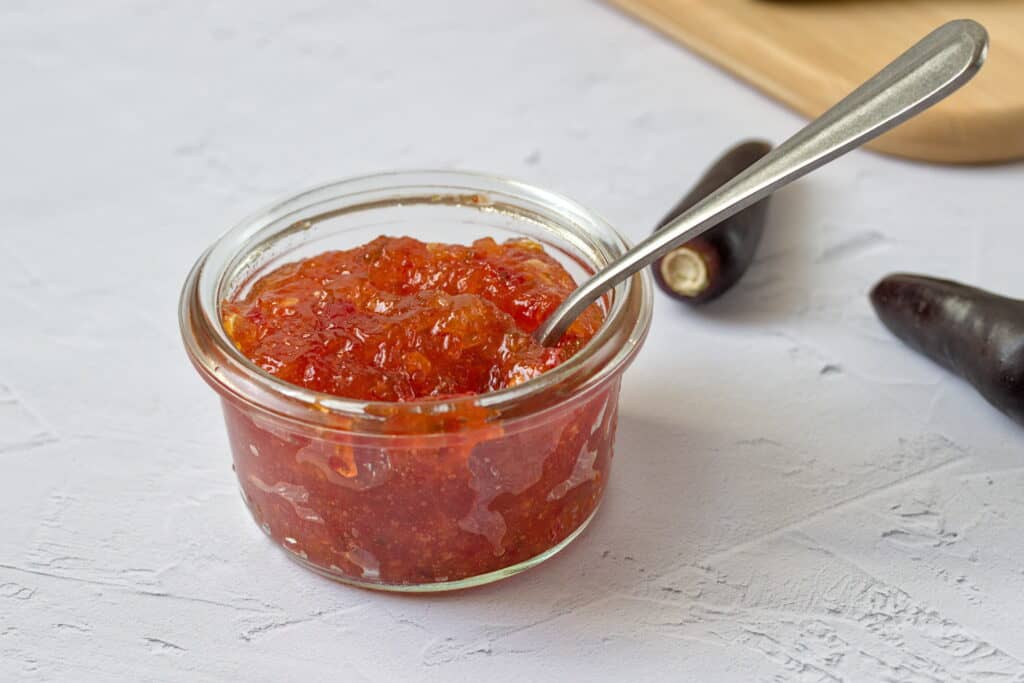
Hot and Sweet Pepper Jelly Ingredients Cooking Instructions Jump to Recipe Home If you’re looking for a unique and flavorful condiment that combines a touch of sweetness with a spicy kick, then this Hot and Sweet Pepper Jelly is the perfect choice. If you’re looking for a unique and flavorful condiment that combines a touch of sweetness with a spicy kick, then this Hot and Sweet Pepper Jelly is the perfect choice. This vibrant jelly is a delightful addition, it pairs well with a variety of dishes from cheese platters to other spreads of your choice. Making your own hot pepper jelly at home is fun. Moreover, it allows you to customize the heat level to your liking. My daughter, of late has got a taste for some spicy condiments. So, I try to make condiments like Fermented hot sauce, hot chili oil and this pepper jelly in order to make it more palatable for her too. Due to lack of time we decided to make them into jams. I will get to that in the second half of this blog post. Table of Contents What is Hot and Sweet Pepper Jelly? Hot Pepper Jelly is a sweet and spicy preserve made from a mix of hot peppers, sugar, and vinegar. The result is a jelly with a beautiful color and a bold flavor that balances sweetness and heat. This versatile condiment can be used as a glaze, spread, or dipping sauce, thus making it a must-have in your kitchen. History of Pepper Jelly The Origins of Pepper Jelly: Pepper jelly has its roots in Southern United States cuisine, where preserving fruits and vegetables in jellies and jams has been a longstanding tradition. The idea of combining spicy peppers with sweet jellies is thought to have emerged as a way to use up an abundant pepper harvest and create a versatile condiment that could complement a variety of dishes. Tools you may need Disclosure: This post contains affiliate links, meaning, at no additional cost to you, we will earn a small commission if you click through and make a purchase. Learn more Sterilized Jam Jars Funnel for filling Blender Heavy bottom Pot Mixing bowl How to make Hot and Sweet Pepper Jelly? Ingredients List 1 chopped bell pepper (red or green) 1 cup or 20 finely chopped hot peppers (such as jalapeños, serranos, or habaneros, seeds removed for less heat) 3 cups of pectin sugar 1 cup apple cider vinegar Juice of 1 lemon 1/2 teaspoon salt Cooking Instructions Prepare the Peppers: Wear gloves in order to protect your hands from the heat of the peppers. I have experienced heat on my hands for almost a week because I forgot to wear the gloves once. Remove the stems, seeds, and membranes from the hot peppers (you can leave some seeds if you prefer a spicier jelly). Chop them roughly and then blend it to a rough consistency. Cook the Peppers: Combine the blended peppers after filtering out the excess liquid with pectin sugar, apple cider vinegar, and salt in a thick bottom pot or saucepan. Remove the liquid from the crushed peppers, only if you want the jelly to be thicker, otherwise its not needed. Bring the mixture to a boil over medium-high heat, then reduce the heat and let it simmer for about 10 minutes.Increase the heat and bring the mixture back to a rolling boil. Boil for 1 minute, stirring constantly. Skim the Foam Skim off any foam that forms on the surface of the jelly using a metal spoon. This will help to ensure a clear jelly, if you want a clear jelly. Plate Test Prior to starting the jam, keep a plate in the freezer. Then drop a little of the jelly and see if it has attained the required consistency. Canning the Jelly: Ladle the hot jelly into sterilized jars, leaving about 1 cm of head space at the top. Wipe the rims of the jars with a clean, damp cloth, and apply the lids and screw bands. Process the jars in a boiling water bath for 10 minutes to ensure they are sealed properly. Remove the jars and let them cool completely. Check the seals after 24 hours – the lids should not flex up and down when pressed. Serving Suggestions Hot Pepper Jelly is incredibly versatile and can be used in numerous ways: Cheese Platters: Serve with cream cheese or goat cheese on crackers for a delightful appetizer.Glaze: Use as a glaze for grilled stuff.Sandwich Spread: Add to sandwiches or burgers for a sweet and spicy kick.Condiment: Use as a dip for spring rolls.Breakfast: Spread on toast, bagels, or scones for a sweet and spicy breakfast treat. Tips for the Perfect Hot and Sweet Pepper Jelly Adjusting the Heat: Customize the heat level by adjusting the amount of hot pepper seeds you include.Consistency: Ensure the jelly sets properly by following the boiling times exactly. If you are using Pectin separately, it needs to boil for the correct amount of time to activate and set the jelly.Sterilization: Properly sterilize jars and lids to prevent contamination and ensure a long shelf life. Types of Peppers you can use While jalapeños are the most commonly used pepper for hot pepper jelly, you can experiment with other types to customize the flavor and heat level: Jalapeños: Mild to medium heat, widely available.Serranos: Slightly hotter than jalapeños, with a bright, fresh flavor.Habaneros: Very hot, with a fruity undertone.Bell Peppers: No heat, but adds color and sweetness. Mixing different peppers can create a unique balance of flavors and colors. Flavor Variations of Sweet and Hot Pepper Jelly Although, the basic recipe is delicious, you can experiment with different ingredients to create unique flavor profiles: Fruit Additions: Try adding crushed pineapple, mango, or apricots for a fruity twist.Herbs: Fresh herbs like rosemary or thyme can add an aromatic depth.Spices: Add a pinch of cinnamon, cloves, or allspice for a warm spicy note. Health Benefits Peppers are rich in vitamins A and C, potassium,
10 Easy Red Currant Recipes
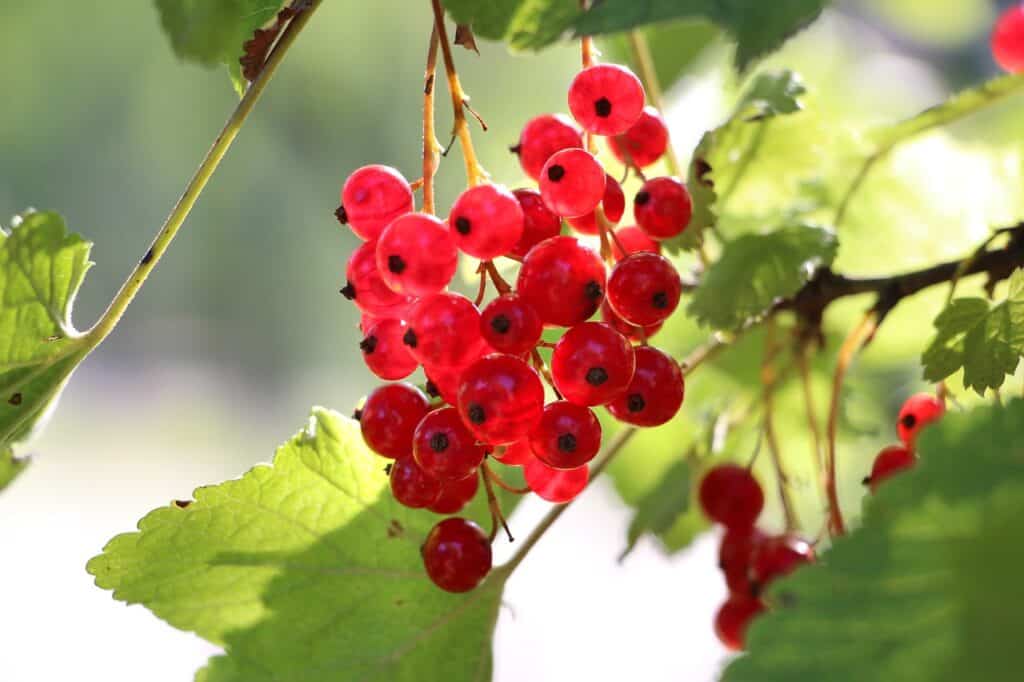
Redcurrants are versatile and can be used in a variety of recipes, both sweet and savory. Here are a few delicious redcurrant recipes to try.
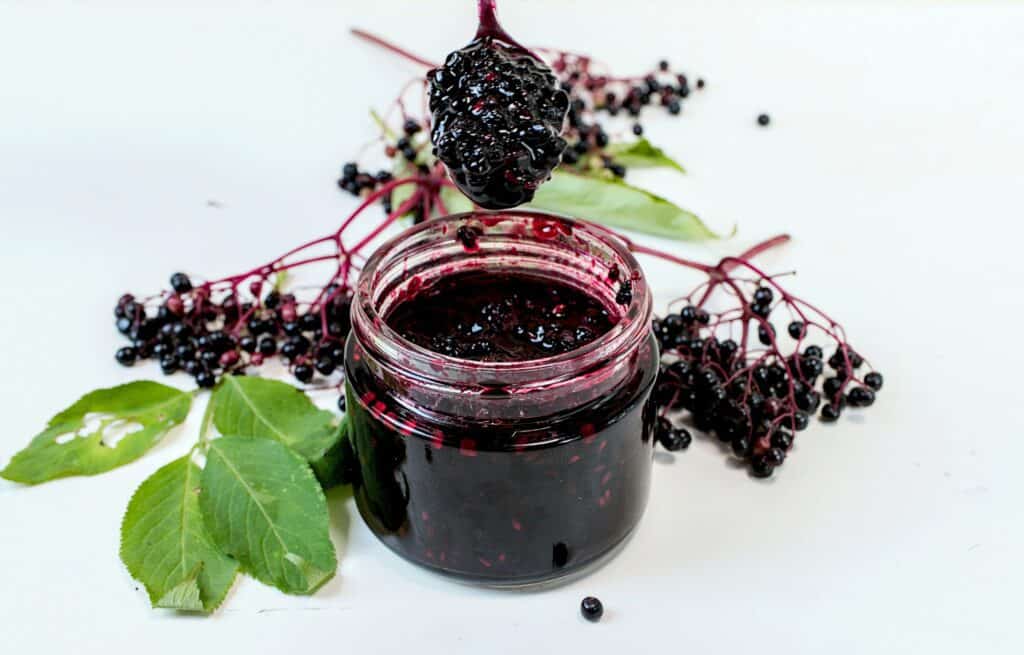
Easy Elderflower Jelly (or Jam) Recipe
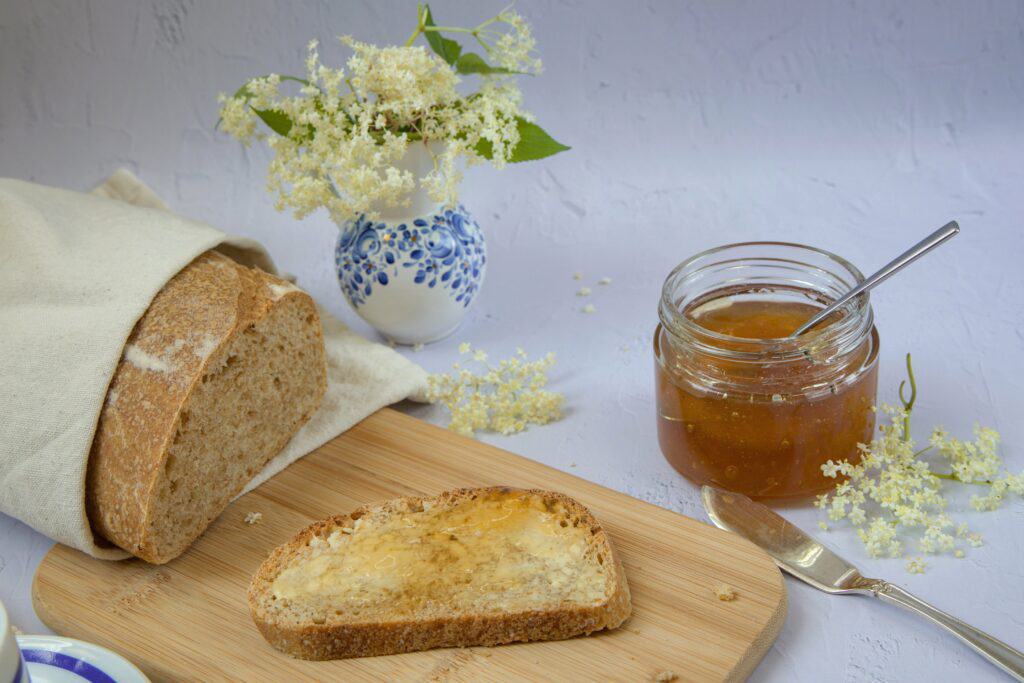
Ingredients Cooking Instructions Jump to Recipe Disclosure: This post contains affiliate links, meaning, at no additional cost to you, we will earn a small commission if you click through and make a purchase. Learn more Home If you’re looking for a unique and flavorful condiment that combines a touch of sweetness with a spicy kick, then this Hot and Sweet Pepper Jelly is the perfect choice. In our cozy corner of the internet, we aim to share easy and delicious recipes that bring your garden produce into your kitchen. One of our favorites is everything to do with Elderflower. This easy Elderflower Jelly (or Jam ) recipe captures the delicate and floral aroma of elderflowers. This Elderflower Jelly (Jam) recipe is sure to enchant your senses and become a favorite in your home, it has become one of my favorites anyway. Table of Contents What is Elderflower? Elderflower comes from the elderberry tree, which blooms with beautiful clusters of tiny, creamy-white flowers in late spring to early summer. These flowers have been used for centuries in various culinary and medicinal applications. Their light, floral flavor makes them an excellent addition to desserts, drinks, and, of course, jams. When making Elderflower Jam, it’s essential to harvest the flowers at their peak to capture their full essence. When is the best time to harvest Elderflowers? Since, elderflower season is short, we have to pick them quickly about just the time they bloom. In my older posts, I have shared a couple of Elderflower recipes – Elderflower Cordial, and Elderflower Mint Syrup which are refreshing summer drinks. Otherwise, they turn to berries. On the other hand, with the berries you can make a jam, compote, or make an immune boosting cold and flu syrup. The best time to pick the flowers is between late May to June. This also depends on the sub-climate in each zone of Europe. Choose a sunny day to harvest your elderflowers, preferably in the morning when their scent is the strongest. Tools you may need Disclosure: This post contains affiliate links, meaning, at no additional cost to you, we will earn a small commission if you click through and make a purchase. Learn more Big stainless steel sauce pan. Sterilized Jam Jars Funnel for filling Heavy bottom Pot Mixing bowl How to make Elderflower Jam Recipe? Ingredients List 3 Cups of Elderflowers removed from the stalks 3 cups of Pectin sugar 3 cups of Apple Juice Juice of a lemon Cooking Instructions Harvesting Elderflowers Choose a sunny day to harvest your elderflowers, preferably in the morning when their scent is the strongest. Gently shake the flower heads to remove any insects and avoid washing them, as this can dilute their flavor. Instead, inspect them carefully and clean if necessary. On the other hand, if you want to wash them, just shortly run them under running water.Snip the flower heads just below the blossoms, removing as much of the green stems as possible. Prepare the ElderflowersPlace the elderflower heads in a large bowl and pour the apple juice over them.Add the lemon juice to the bowl. Or you can add the juice while making the jam too.Cover the bowl with a clean cloth and let it sit for 24-48 hours to allow the flavors to infuse. How to make Elderflower Jelly (or Jam)After infusing the flower, strain the liquid through a fine-mesh sieve or cheesecloth into a large pot. Discard the spent flowersAdd the pectin sugar to the pot and stir well to dissolve. In case you are using normal sugar and adding pectin separately, follow the instructions on the pectin package.Bring the mixture to a boil over medium-high heat, stirring frequently.Reduce the heat and let the mixture simmer for about 15-20 minutes, or until it reaches a thick, jam-like consistency. You can test this by placing a small spoonful on a chilled plate, if it gels and holds its shape then it’s ready to be bottled. Canning the finished Elderflower JellyWhile the jam is simmering, sterilize your jars and lids by boiling them in water for 10 minutes.Carefully ladle the hot jam into the sterilized jars, leaving about 1/4 inch of headspace at the top.Wipe the rims of the jars with a clean, damp cloth to remove any residue, then seal with the lids.Process the jars in a boiling water bath for 10 minutes to ensure a proper seal.Remove the jars from the water bath and let them cool completely. You should hear a “pop” as the lids seal. How long can you store your Elderflower Jelly? Store your cooled in a cool and dark place. I usually store my jams in our celler which is cooler. Because, our cellar is cool and dark this Elderflower jelly will keep for a year. Once opened, store the jam in the refrigerator and use it within a few weeks. Elderflower Jelly (or Jam) Serving Tips Elderflower Jam is a versatile and delightful treat. We spread our elderflower jelly on our homemade bread toasts, scones and pancakes. Other possible uses are to use it as a filling for cakes and pastries. Moreover, I love to add all of my homemade jams and jelly’s into gift baskets. Watch the Video Recipe Card Your feedback is valuable If you try this recipe and love it, I would love if you come back and gave it 5 stars! Thank you so much for visiting Vial Fair Living – we’re so happy you’re here! I would love it if you can share this recipe using the social media buttons you see next to the post. Frequently Asked Questions Accordion Tab Title 1 Click edit button to change this text. Lorem ipsum dolor sit amet, consectetur adipiscing elit. Ut elit tellus, luctus nec ullamcorper mattis, pulvinar dapibus leo. Accordion Tab Title 2 Click edit button to change this text. Lorem ipsum dolor sit amet, consectetur adipiscing elit. Ut elit tellus, luctus nec ullamcorper mattis, pulvinar dapibus leo. Accordion Tab Title 3 Click edit button to
Pawpaw Jam Recipe
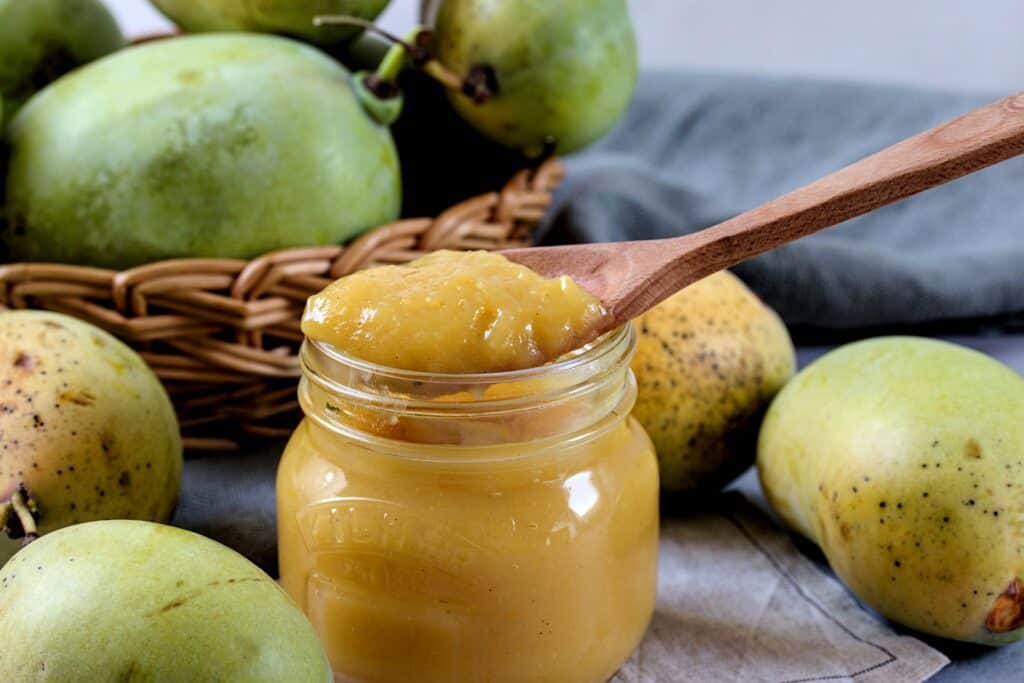
Ingredients Cooking Instructions Jump to Recipe Disclosure: This post contains affiliate links, meaning, at no additional cost to you, we will earn a small commission if you click through and make a purchase. Learn more Home Pawpaws are the fruit of the Asimina triloba tree, which is native to the eastern United States and southern Canada. We waited 5 years patiently to reap the benefits of our Pawpaw Tree. Finally, this year we had an abundance of this tasty tropical tasting fruit. The taste and flavor is a delicious combination of banana, mango and custard apple. Our Pawpaw fruits look a little like mangoes. But anyway who cares how it looks, as long as its tasty and we are able to harvest our own fruits. With so much of abundance, I wanted to preserve this harvest, so I made this easy and delicious Pawpaw jam recipe. While starting our garden, we were looking for some easy maintenance trees which gives us delicious fruits. And we went a little wild with planting a few. Some of the other trees we planted take longer to fruit. But surprisingly, this year we had a lot of paw paws to harvest. We shared our abundance with neighbors and friends too. For most of our neighbors this was a novelty to try. Pawpaws are the fruit of the Asimina triloba tree, which is native to the eastern United States and southern Canada. Pawpaws are the northernmost member of the Annonaceae plant family, which consists mainly of tropical and subtropical plants. They’re considered the largest edible fruit native to North America, measuring 2–6 inches (5–16 cm) and 1–3 inches wide (3–7 cm). The climate in Switzerland is similar to that of North America, therefore, we thought planting them would be great for our food forest. We just had to be patient for this many years to reap the benefit. We planted 2 trees and one of the trees gave us bigger sized fruits but the other one although younger still produced a lot. My husband and I ate almost 2 to 3 fruits everyday as soon as they ripened. But I still had so much that I made a pawpaw jam to preserve it for winter. I make a lot of jams and have shared recipes regularly on this blog. Check out my other jam recipes. Table of Contents Tools you may need Disclosure: This post contains affiliate links, meaning, at no additional cost to you, we will earn a small commission if you click through and make a purchase. Learn more Glass Jars Funnel for filling Heavy bottom Pot Mixing bowl Wooden cutting board How to make Pawpaw Jam? Ingredients List 2 Kg of ripe pawpaws pureed 2 cups of water 1/2 cup of lemon juice ( I used the bottled one ) 1 Kg of white castor sugar 1 tsp cinnamon powder 2 tsp Vanilla powder Juice and grated peel of that orange ( Optional ) Cooking Instructions Wash and cut the pawpaw. Remove the flesh from the fruit by scooping it with a spoon after removing the seeds. Discard the skin of the fruit. Mash the pulp using a food mill, immersion blender or a food processor. In a heavy bottom large saucepan mix all the ingredients and cook down on low until the mixture thickens. This will take about an hour or more depending on the quantity you have. Do the plate test. Once the jam sets switch off the heat. Fill into sterilized glass jars leaving about 1 cm before sealing the jars. Do a water bath canning for 10 minutes. Tips for making Pawpaw Jam Recipe The jam doesn’t need pectin and it sets easily without it if you cook it longer. Since, pawpaws are not extremely sweet, I prefer to add enough sugar to preserve it. For doing the plate test, set a plate in the freezer. Drop a little of the cooked jam on to the cold plate and tilt it a little, if the jam stops flowing then the jam is ready to bottle. Recipe Card Your feedback is valuable If you try this recipe and love it, I would love if you come back and gave it 5 stars! Thank you so much for visiting Vial Fair Living – we’re so happy you’re here! I would love it if you can share this recipe using the social media buttons you see next to the post. Frequently Asked Questions How long can you store Pawpaw jam? I am not very sure about this, as this was the first time I had access to this fruit. Generally, all the jams I make store well for a year or even more. Because sugar is the preservative. Although, I recently got a pressure canning cooker, I am yet to try canning jams with it. What can you use pawpaw jam for and can you eat it raw? You can add the jam to a smoothie, or pudding and on bread toast. Yes, you can eat the fruit raw which is what we love the most. Wash and cut into half remove the seeds and scoop out the flesh of the fruit and eat it like a pudding. Make sure they are soft, they usually turn somewhat blackish, but don’t wait too long with it. Leave a ReplyPlease enable JavaScript in your browser to complete this form.Name *Email *Website / URLMessageCheckboxes Yes, add me to your mailing list. Submit Popular Recipes Subscribe Signup for our NewsletterUnlock a world of flavor, creativity, and green living. Subscribe for exclusive recipes, DIY tutorials, and gardening advice.Please enable JavaScript in your browser to complete this form.Name *Email * Submit Popular Recipes
Best Elderberry Compote Recipe
This is probably one of the best elderberry compote recipes, I have come across. I substituted cinnamon with vanilla bean.
Easy Homemade Elderberry Jam Recipe

Ingredients Cooking Instructions Jump to Recipe Disclosure: This post contains affiliate links, meaning, at no additional cost to you, we will earn a small commission if you click through and make a purchase. Learn more Home If you’re looking for a unique and flavorful condiment that combines a touch of sweetness with a spicy kick, then this Hot and Sweet Pepper Jelly is the perfect choice. It is that time of the year, when we gardeners are busy preserving our harvest. One of the abundance we have is Elderberry. If you have access to fresh elderberries, then add this easy 3-ingredient Homemade Elderberry Jam Recipe to your list. This recipe is the perfect way to preserve the luscious taste and health benefits of elderberry for the coming winter months. Table of Contents Tools you may need Disclosure: This post contains affiliate links, meaning, at no additional cost to you, we will earn a small commission if you click through and make a purchase. Learn more Glass Jars Funnel for filling Heavy bottom Pot Wooden cutting board How to make Homemade Elderberry Jam? Ingredients List 500 gms of ripe fresh elderberries 400 gm of jam sugar or pectin sugar 1 tbsp on lemon juice Cooking Instructions Remove the ripe berries from their stalks with a fork. Remove the leaves too. Wash the berries thoroughly. Transfer the clean berries into a heavy bottom pan and crush them a little to release some juices. We want the berry texture too, so don’t mash all of the berries. Add the sugar to the berries and once cooked add the lemon juice. Simmer on a low heat and stir continuously to prevent the jam from sticking to the bottom. Cook for around 20 minutes. Discard any scum which has raised to the surface. Do the plate test. Drop a small dollop of the jam on the frozen plate and tilt it. If it has formed a skin and stopped flowing, then its ready for bottling. Alternatively you can also set the plate in the fridge for a few minutes and once the skim is formed, bottle. In case the skin on the jam has not formed, continue cooking and repeat the above process at intervals, till you reach the right consistency. Fill the jam into sterilized glass jars by setting the jar on a tea towel or a wooden board to avoid the jars from cracking. Tips for the Perfect Homemade Elderberry Jam Pick the berries only when ripe. Since elderberries in their raw form contain a constituent similar to cyanide, always cook these berries before consuming. Canning the jam will help to preserve the jam longer. Keep a plate in a freezer so you can test if the jam has achieved the right consistency before bottling. Lemon juice brings back the vibrant colors of the cooked elderberries. Bottle the jam by setting the glass jars on a wooden board otherwise, the jars will crack. Use appropriate tools in order to prevent burns and scalding, since the cooked jam is very hot. Health Benefits Elderberries naturally contain vitamins A, B, and C to stimulate the immune system. A few studies have suggested that elderberry could help with bacterial sinus infections or bronchitis. More research needs to be done on this. I don’t claim anything here, but I enjoy all these fresh produce from my garden. On the other hand, my personal experience with our elderberry cold and flu syrup is that it has worked wonders for us in preventing winter colds so far. Elderberries Recipe Card Your feedback is valuable If you try this recipe and love it, I would love if you come back and gave it 5 stars! Thank you so much for visiting Vial Fair Living – we’re so happy you’re here! I would love it if you can share this recipe using the social media buttons you see next to the post. Frequently Asked Questions How long can you store homemade elderberry Jam ? Unopened bottled jam can be stored in a cool dark place easily for 1 year. Some of my jams store longer too. Once you open the jam, store in the fridge and consume quickly. It is advisable to use smaller jars for bottling so they are used up quickly once opened. Leave a ReplyPlease enable JavaScript in your browser to complete this form.Name *Email *Website / URLMessageCheckboxes Yes, add me to your mailing list. Submit Popular Recipes Subscribe Signup for our NewsletterUnlock a world of flavor, creativity, and green living. Subscribe for exclusive recipes, DIY tutorials, and gardening advice.Please enable JavaScript in your browser to complete this form.Name *Email * Submit Popular Recipes
Homemade Pineapple Jam (with or without Pectin )
Ingredients Cooking Instructions Jump to Recipe Disclosure: This post contains affiliate links, meaning, at no additional cost to you, we will earn a small commission if you click through and make a purchase. Learn more Home I love making jams literally out of our berries and fruit harvest. The best way to preserve fruits long term without refrigeration is with sugar. Pineapple Jam is an easy way to preserve tropical fruits like pineapple to enjoy all year round. This homemade pineapple jam fits the bill for many reasons. Its perfect on sandwiches, toast and great as an ice cream topping too. Pineapple is one of my favorite fruits, I use this tropical fruit in many ways. The best is to eat it fresh as they don’t last that long at room temperature. At best, the flavor of ripe pineapple remains only for a few hours in the refrigerator. So the best way to preserve any fruit’s flavor to last longer is to make fruit preserves with sugar. I make jams and jelly from almost any fruit I have. My mother used to make jams with tomatoes and sour gooseberries too. Granted Pineapple is not native in Europe, but due to modern transportation from afar, we are able to get them in our supermarkets easily today. Although, I prefer locally grown fruits and produce, sometimes I break this rule and indulge myself once in a way. Jams and jellies are top on my food preservation list during the summer months. In addition to preserving our fruit harvest, they also make great handmade gifts. I love to add jams and other preserves into my Christmas gift basket. Table of Contents How to Make Homemade Pineapple Jam? Ingredients List For Recipe without Pectin 3 cups of chopped and crushed pineapple after peeling and coring 1 1/2 cups of sugar ( if you want jam without pectin) For Recipe with pectin sugar 3 cups of crushed pineapple 2 cups of pectin sugar if you want it sweeter you can add same quantity as that of the fruit. Reduce sugar if the pineapple is ripe and sweet. Measurement with weight 500 gm of crushed pineapple 250 gm of pectin sugar Tools you may need Disclosure: This post contains affiliate links, meaning, at no additional cost to you, we will earn a small commission if you click through and make a purchase. Learn more Silicone Canning Jar Lifter and Funnel Sterilized glass jars Making pineapple jam isn’t all that different from making any other homemade fruit jam. As with other jams, you have to prep the fruit and then cook the pineapple in sugar until it thickens. There are 2 ways to make jam i.e. with or without pectin. Well a lot depends on the pectin content of the fruit. Pineapples don’t have much natural pectin, but they still thicken up nicely due to the fiber when cooked. If you want to make pineapple jam without pectin the flavor is stronger, concentrated and sweeter too. This is technically called a fruit preserve, because jams need pectin. The basic method to make pineapple jam without pectin, is to use 1 part sugar to every 2 parts of fruit. Preparing Pineapple for making Jam For making homemade pineapple jam, you can either use fresh and ripe pineapples or from the tin. Tinned pineapple does not have much flavor and has a strange metallic taste to it. How to cut fresh Pineapple? Cut the green crown part and the bottom part a little. Next halve the pineapple and then slice of the peel. Its easier to peel that way and you can easily remove the thorns too. Next remove the core of the pineapple and then cut into smaller cubes. Then place the chopped pineapple in a food processor and pulse for 2 or 3 pulses, till its fine but not completely pureed. Instructions I have a rule of thumb for all my jams recipes and its really very simple. Hence, I will not make it complicated and by following this method you will have a jam for many months that has a long shelf life. Mix the crushed fruit and sugar in a heavy bottom pot and cook between medium to high heat. Keep stirring the mixture to avoid it getting burnt. Thicken the fruit and sugar mixture, this takes about 20 to 25 minutes, depending on the quantity you are making. If you make the jam with pectin sugar, the process is faster. Once the bubbles change from boiling, it will attain a glossy sheen and texture when it is finished. I usually do a plate test to confirm that its ready. Place a plate in the freezer and drop a little of the jam and tilt it. If it sets then its ready for bottling. Fill the jams in hot and dry sterilized glass jars by placing the hot jars on a tea towel or a wooden board. Leave about 1/2 cm space and wipe the rims of the jar before closing the lid tightly. Cool it, and a vacuum will be formed after several hours, you will hear the lid popping which means it sealed well. A nicely vacuum sealed jam will last up to a year or even more. I have jams which lasted even 2 years in our cellar. Once you open the jam jar store it in the refrigerator. Serving Suggestions Hot Pepper Jelly is incredibly versatile and can be used in numerous ways: Cheese Platters: Serve with cream cheese or goat cheese on crackers for a delightful appetizer.Glaze: Use as a glaze for grilled stuff.Sandwich Spread: Add to sandwiches or burgers for a sweet and spicy kick.Condiment: Use as a dip for spring rolls.Breakfast: Spread on toast, bagels, or scones for a sweet and spicy breakfast treat. Tips to make Pineapple Jam without Pectin If you choose to make pineapple jam without pectin and want more quantity, then add 2:3 sugar to fruit proportion. Which means you add
Easy Red Currant Jelly Recipe ( without pectin )
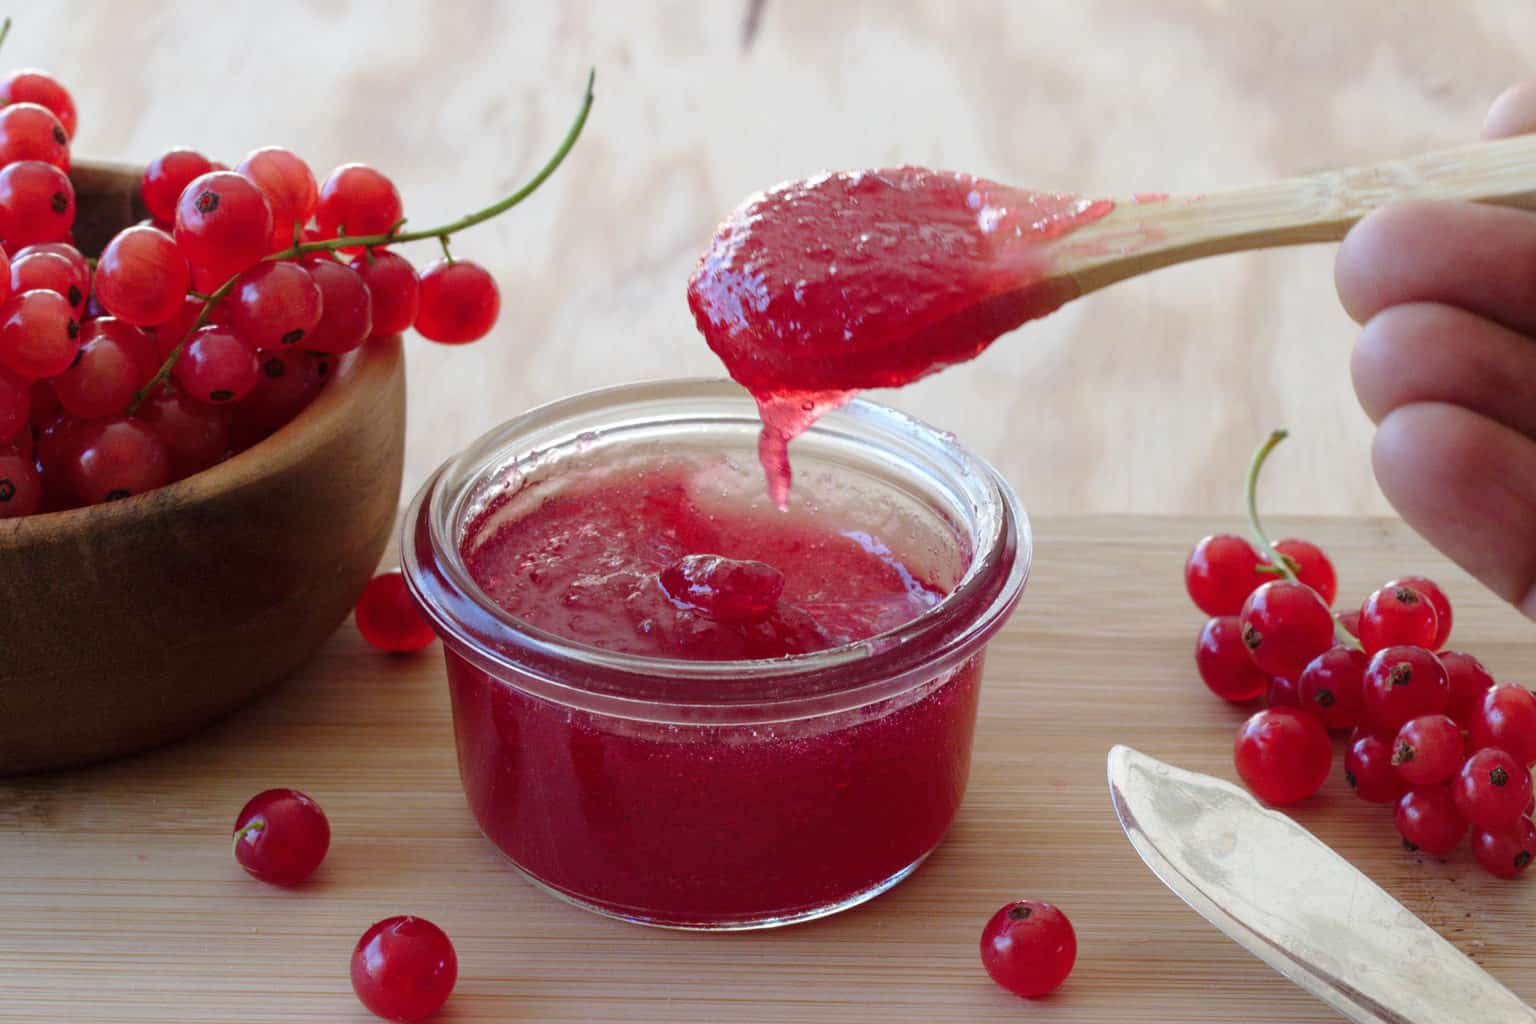
This easy red currant jelly recipe is tart in taste and spreads easily on toast or great on ice creams.
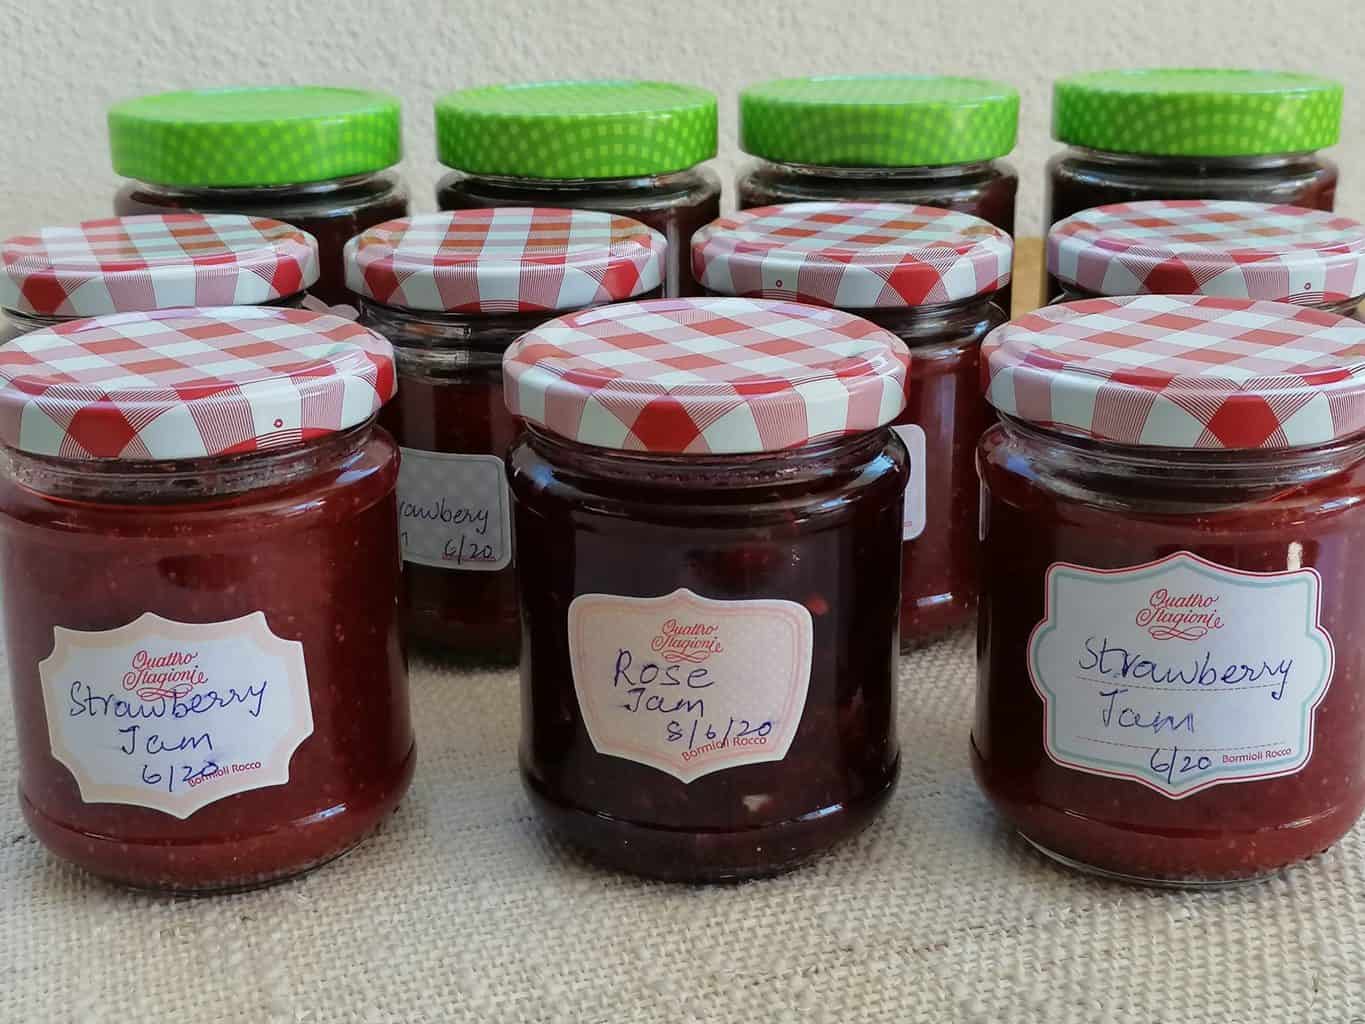
Easy Rose Petal Jam Recipe
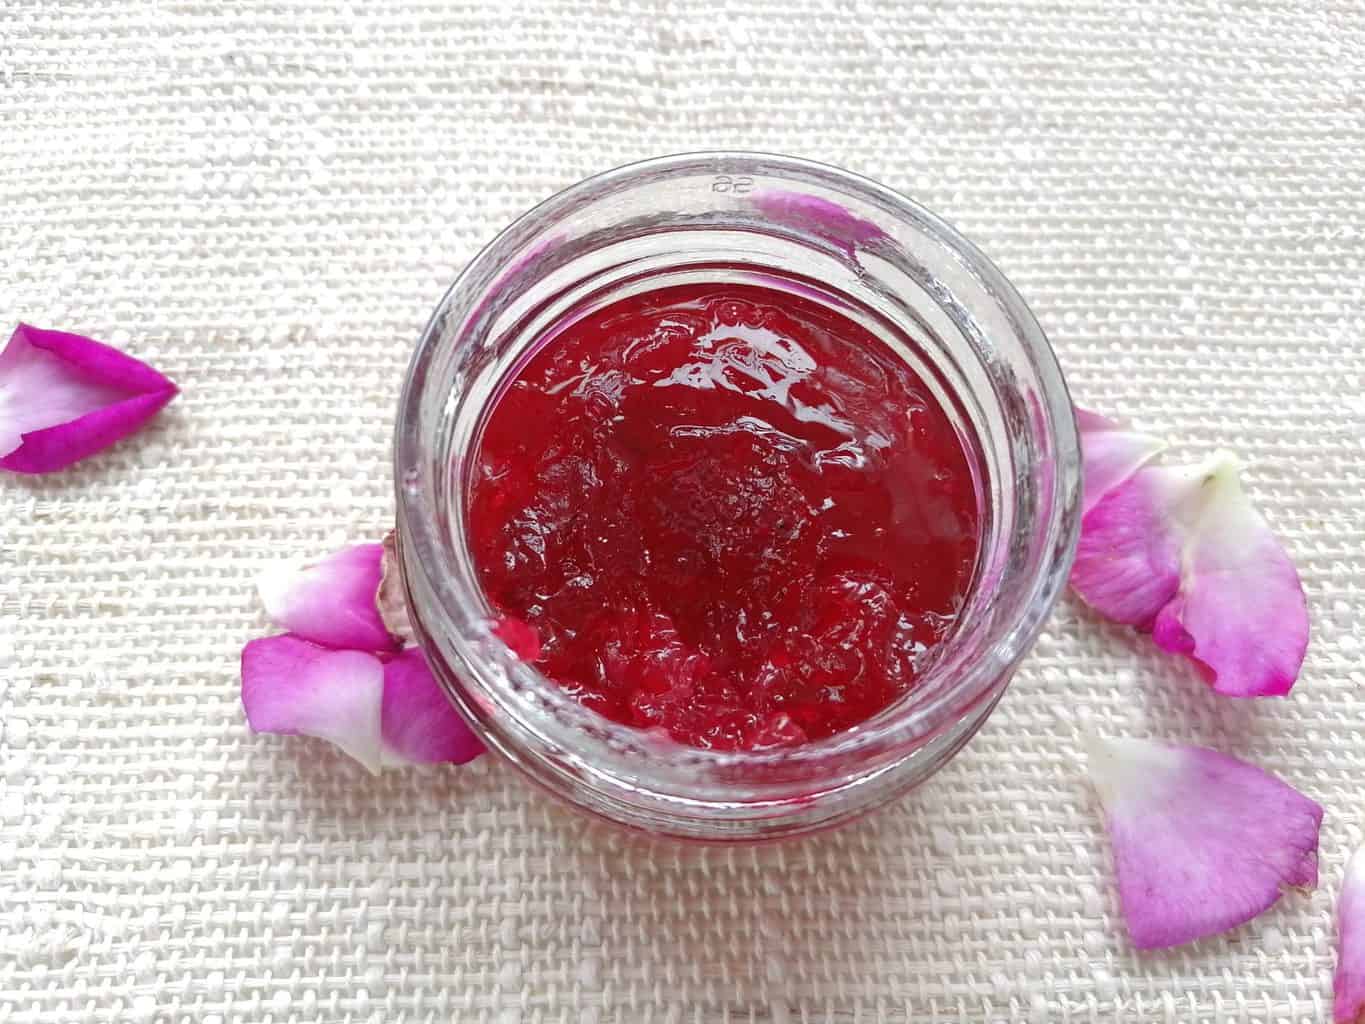
Easy rose petal jam recipe is a simple delicious recipe made with fresh rose petals and is perfect on toast, scones, cakes and ice creams or smoothies.
6 Easy Homemade Jam Recipes
Summer is the time of abundance for seasonal fruits and berries. In this post, I am sharing with you my 6 easy homemade jam recipes that you can prepare easily.