
Lacto fermented red currants
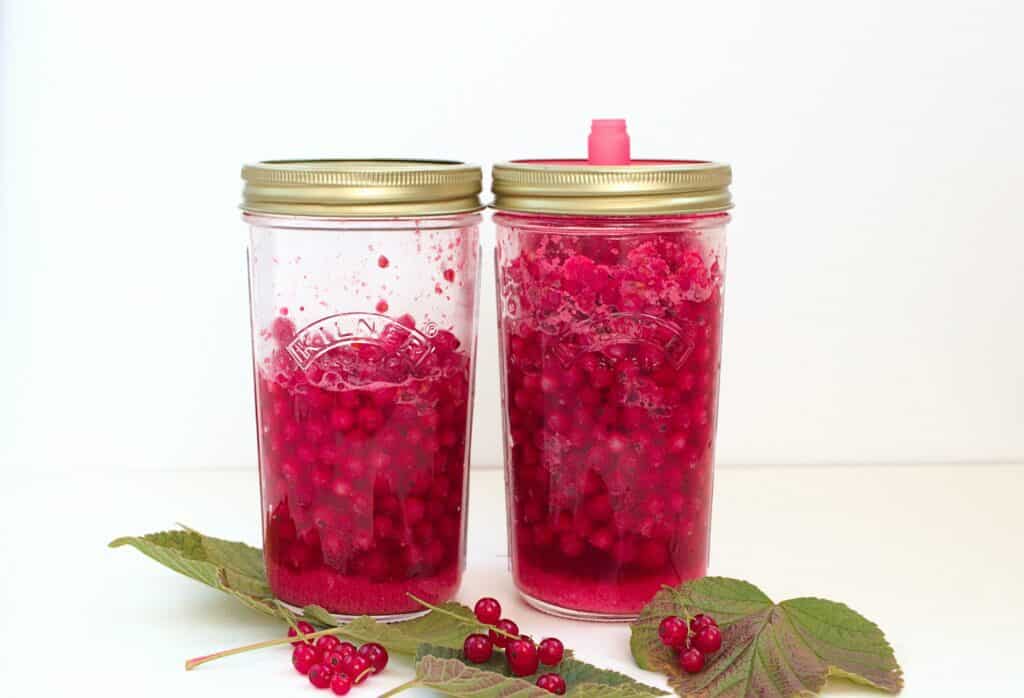
Ingredients Cooking Instructions Jump to Recipe Disclosure: This post contains affiliate links, meaning, at no additional cost to you, we will earn a small commission if you click through and make a purchase. Learn more Home Red currants are in season and I make a few preservation recipes with them. These berries taste wonderful once they are ripe after harvest. But they don’t last very long after harvesting. You know my love for fermented healthy food, so I also made lacto fermented red currants to enjoy the health benefits of fermented fruits as well. You know my love for fermented healthy food, so I also made lacto fermented red currants to enjoy the health benefits of fermented fruits as well. Table of Contents What You Need to Know about Lacto Fermenting Berries? Fermentation is a near-magical process that transforms any food. My kitchen and refrigerator is filled with fermented batter, bubbling sourdough starter, yogurt, sauerkraut, pickles and hot sauce to name a few. This lacto-fermented red currants recipe is simple to make. All you need is berries, a sweetener, water, and a starter culture to help start the fermentation process. Fermented fruit don’t need long fermentation process. A couple of days at the most and they are ready. Lacto-fermented berries taste wonderful. They are both sweet and tangy. You can use them on oat meal porridge, fruit salads or berry infused water. They are even great to eat as a snack with homemade yogurt and a little sweetener. Tools you may need Disclosure: This post contains affiliate links, meaning, at no additional cost to you, we will earn a small commission if you click through and make a purchase. Learn more Fermenting weights Sterilized glass jars Fermentation Lids How to make Lacto-Fermented Red Currants? Ingredients List Ripe Red Currants – 1 Liter Honey – 4 tablespoon Himalaya Salt – 1/2 teaspoon Whey or liquid from yogurt – 4 tablespoon Water – 4-6 tablespoons ( I used filtered water from my Berkey filter ) Instructions Remove the red currants from their stalks and wash it thoroughly and drain excess water. Mix all the ingredients together in a mixing bowl. Crush the berries a little in order to extract some juice. Set it aside for a few minutes and you will see the berries sweat a bit more. Fill the mixture tightly into sterilized fermenting glass jars. Leave a little space before placing the fermenting weights and for the gas to escape. The weight helps in keeping the red currants fully submerged in the liquid and keeping the oxygen out. Make sure that the berries are fully submerged in the juices and liquid. Close with the fermenting lid and set it below a tray to let the fermenting gas and any liquid to escape Leave at room temperature for 1-2 days. Store in refrigerator and use within 1-2 months. Tips to use Lacto-Fermented Red Currants Since, fruits and berries soften during fermentation, you will be getting a thin and slightly jammy texture. You can puree them and use them in smoothies, muesli or in yogurt. Tips to make Lacto-Fermented Red Currants Recipe Use fermenting weights for lacto fermentation. Don’t ferment fruits for more than 2 days or they will get alcoholic. Use a starter culture for lacto fermenting fruits and berries, so that its quicker. Add a sweetener like honey to speed up the fermentation process. You will need the berries to be fully submerged in the liquid so it keeps the oxygen out to avoid mold. Why do you need to use fermenting weights? I have tried previously to use sterilized stones, but I did have a moldy result sometimes and had to throw it out. Since, I have these fermenting weights my fermenting foods works like a dream. Because, these weights are perfectly fitting into mason jars, you can easily ferment small quantities of fruits or vegetables. In addition to it you can use fermenting lids to let the air out during the fermentation process. How to Know When Your Lacto Fermented Red Currants are ready? Unlike sauerkraut or cucumbers which typically benefit from a long period of fermentation, berries on the other hand benefit from a very short fermentation. Therefore, you need only one to two days. Moreover, you want to stop the fermentation before they turn alcoholic. This way they will keep the sweetness intact. After about a day, you’ll notice little bubbles appearing at the surface of the jar. Open the jar, spoon out a berry and taste it. If it tastes tart and faintly effervescent then they are done. Recipe Card Your feedback is valuable If you try this recipe and love it, I would love if you come back and gave it 5 stars! Thank you so much for visiting Vital Fair Living – we’re so happy you’re here! I would love it if you can share this recipe using the social media buttons you see next to the post. Frequently Asked Questions Why do you need a sweetener? When you add a sweetener to fruits and berries it helps to speed up the fermentation process. It also proves a source of carbohydrates for the beneficial bacteria which you want to cultivate.The sugars that remain after fermentation gives the berries a wonderful sweetness to balance their tartness. Lacto fermented red currants are quite tart, which I personally don’t mind. But we want our children and the rest of the family to eat this healthy food, so the sweetener helps. Can you use honey as a sweetener? Yes, honey is antimicrobial because it has a low water content and ferments just fine. The addition of a sweetener in this recipe for fermented berries helps, like the starter culture to speed up fermentation by providing a source of carbohydrates for the beneficial bacteria you’re hoping to cultivate. The sugars that remain after fermentation give the berries a wonderful sweetness to balance their tartness. How long can you store Lacto-fermented Red currant berries? Lacto-fermented berries should be stored
How to start and sustain a productive garden
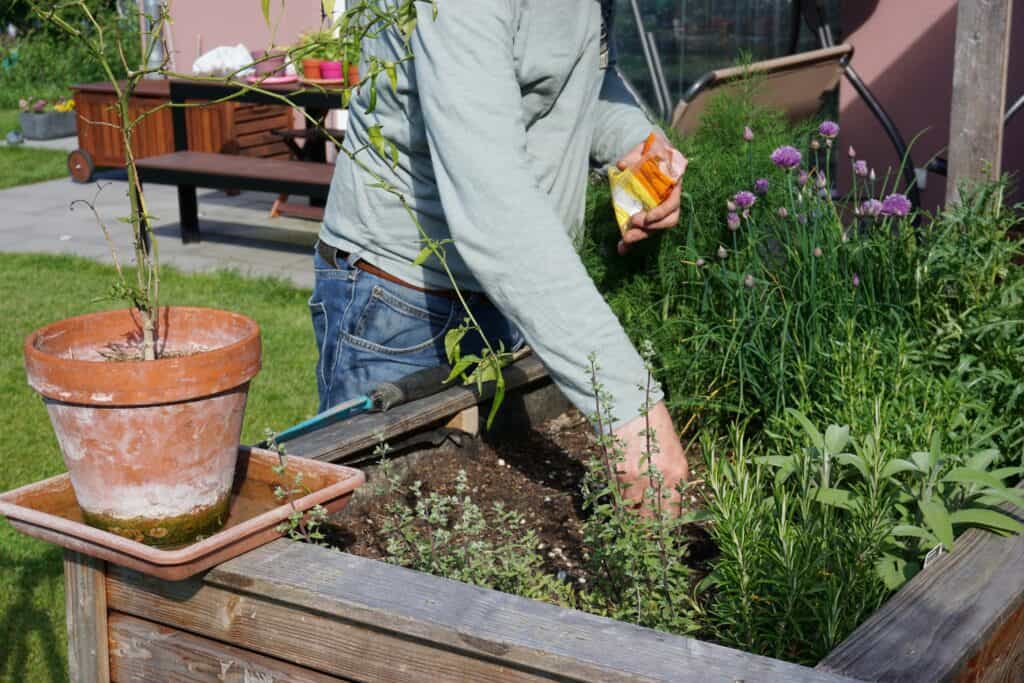
Disclosure: This post contains affiliate links, meaning, at no additional cost to you, we will earn a small commission if you click through and make a purchase. Learn more Home With the current global scenario, pressure on farmers due to rising gas prices and growing food shortages, there’s no better time than now to grab a shovel and begin growing your own produce. Even if you’ve never turned a hand to gardening, with a few expert tips, you can move closer toward self-sufficiency and enjoy fresh vegetables year-round. So, to help you jump start with gardening, we will explore ways on how to start and sustain a productive garden. This post is written by our guest author Shirley Martin of tidylifetoday.com Table of Contents Gardening Layout Since, the location and layout of your garden are crucial to the cultivation of healthy, ripe produce. You’ll want to plan out your patch before you put spade to soil. Pick the sunniest spot in the yard to favor vegetables (which typically need 6 to 8 hours of sunlight per day). Try to limit your plot size to a maximum of 10’x10’ (feet). A smaller garden will prove more manageable. Choose a space that is shielded from strong winds. Strong winds can knock over, disrupt plant growth or keep pollinators from doing their job! Gardening Methods to start and sustain a productive garden As important as the location of your plot are, so are the methods on how you tend it. Sharpen up your tools and your mind with these resources. There are seven planting methods, including seed propagation, cutting, layering, division, grafting, budding, and tissue culture technique. Each offers its own unique uses and benefits. So it pays to experiment a little at the beginning and see what works out the best for your garden conditions and environment. Your irrigation methods may differ depending on soil, crop type, water availability, and planting setup. If you want to go an extra step towards protecting the environment you can try some water-saving techniques. Gardening Materials Finding and using the right materials, from soil to fertilizer, is paramount for a long-lasting, fruitful garden patch. Here are some for your consideration. Soil types, ranging from loamy to peaty, all contain differing, unique benefits. Look for fertilizer by doing an online search for “fertilizer company near me.” This way, you can read reviews to ensure the business you’re using is on the up and up. There is an art to choosing the right seeds and it’s worth learning about the different labels/brands. Check out my older post on why to save heirloom seeds. Remember to track and keep receipts whenever you make changes to the garden. Because, this can add to your home’s appraisal value. It can feel a little daunting when first starting out with gardening but, after the shovel’s first gone in, but you’re sure to be hooked on a new, healthier way of life. I hope these tips on how to start and sustain a productive garden is useful to you to motivate you to start planting. Check out my earlier post on Tips to start a garden from scratch for beginners. Your feedback is valuable Thank you for taking the time to read and if you have more tips drop me a line in the comments below. Leave a ReplyPlease enable JavaScript in your browser to complete this form.Name *Email *Website / URLMessageCheckboxes Yes, add me to your mailing list. Submit Related Posts Subscribe Signup for our NewsletterUnlock a world of flavor, creativity, and green living. Subscribe for exclusive recipes, DIY tutorials, and gardening advice.Please enable JavaScript in your browser to complete this form.Name *Email * Submit Popular Posts
Homemade Pineapple Jam (with or without Pectin )
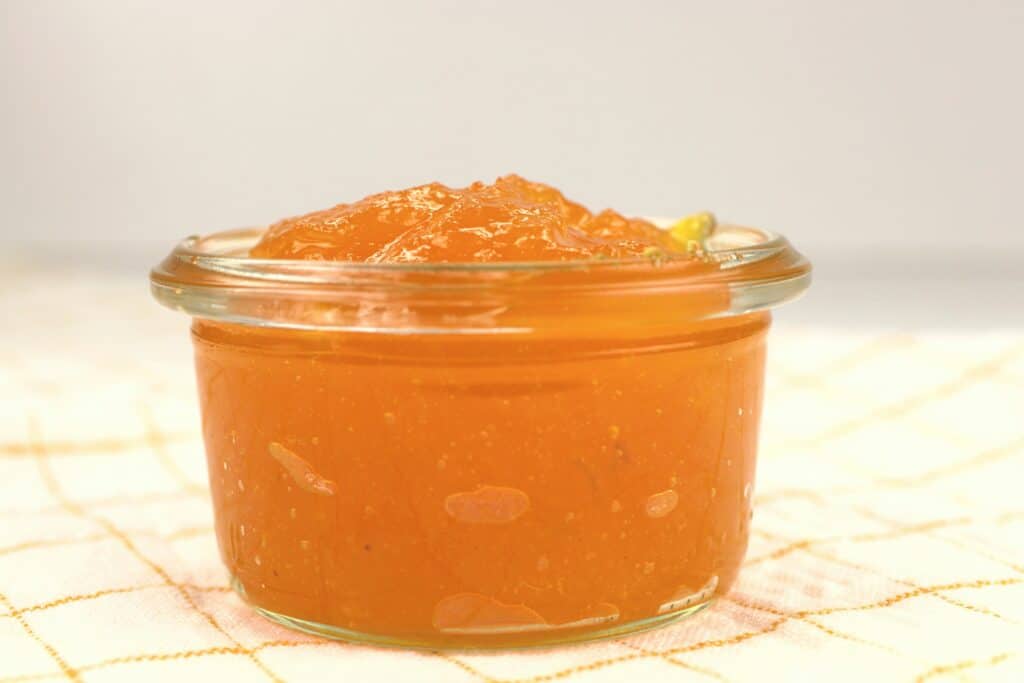
Ingredients Cooking Instructions Jump to Recipe Disclosure: This post contains affiliate links, meaning, at no additional cost to you, we will earn a small commission if you click through and make a purchase. Learn more Home I love making jams literally out of our berries and fruit harvest. The best way to preserve fruits long term without refrigeration is with sugar. Pineapple Jam is an easy way to preserve tropical fruits like pineapple to enjoy all year round. This homemade pineapple jam fits the bill for many reasons. Its perfect on sandwiches, toast and great as an ice cream topping too. Pineapple is one of my favorite fruits, I use this tropical fruit in many ways. The best is to eat it fresh as they don’t last that long at room temperature. At best, the flavor of ripe pineapple remains only for a few hours in the refrigerator. So the best way to preserve any fruit’s flavor to last longer is to make fruit preserves with sugar. I make jams and jelly from almost any fruit I have. My mother used to make jams with tomatoes and sour gooseberries too. Granted Pineapple is not native in Europe, but due to modern transportation from afar, we are able to get them in our supermarkets easily today. Although, I prefer locally grown fruits and produce, sometimes I break this rule and indulge myself once in a way. Jams and jellies are top on my food preservation list during the summer months. In addition to preserving our fruit harvest, they also make great handmade gifts. I love to add jams and other preserves into my Christmas gift basket. Table of Contents How to Make Homemade Pineapple Jam? Ingredients List For Recipe without Pectin 3 cups of chopped and crushed pineapple after peeling and coring 1 1/2 cups of sugar ( if you want jam without pectin) For Recipe with pectin sugar 3 cups of crushed pineapple 2 cups of pectin sugar if you want it sweeter you can add same quantity as that of the fruit. Reduce sugar if the pineapple is ripe and sweet. Measurement with weight 500 gm of crushed pineapple 250 gm of pectin sugar Tools you may need Disclosure: This post contains affiliate links, meaning, at no additional cost to you, we will earn a small commission if you click through and make a purchase. Learn more Silicone Canning Jar Lifter and Funnel Sterilized glass jars Making pineapple jam isn’t all that different from making any other homemade fruit jam. As with other jams, you have to prep the fruit and then cook the pineapple in sugar until it thickens. There are 2 ways to make jam i.e. with or without pectin. Well a lot depends on the pectin content of the fruit. Pineapples don’t have much natural pectin, but they still thicken up nicely due to the fiber when cooked. If you want to make pineapple jam without pectin the flavor is stronger, concentrated and sweeter too. This is technically called a fruit preserve, because jams need pectin. The basic method to make pineapple jam without pectin, is to use 1 part sugar to every 2 parts of fruit. Preparing Pineapple for making Jam For making homemade pineapple jam, you can either use fresh and ripe pineapples or from the tin. Tinned pineapple does not have much flavor and has a strange metallic taste to it. How to cut fresh Pineapple? Cut the green crown part and the bottom part a little. Next halve the pineapple and then slice of the peel. Its easier to peel that way and you can easily remove the thorns too. Next remove the core of the pineapple and then cut into smaller cubes. Then place the chopped pineapple in a food processor and pulse for 2 or 3 pulses, till its fine but not completely pureed. Instructions I have a rule of thumb for all my jams recipes and its really very simple. Hence, I will not make it complicated and by following this method you will have a jam for many months that has a long shelf life. Mix the crushed fruit and sugar in a heavy bottom pot and cook between medium to high heat. Keep stirring the mixture to avoid it getting burnt. Thicken the fruit and sugar mixture, this takes about 20 to 25 minutes, depending on the quantity you are making. If you make the jam with pectin sugar, the process is faster. Once the bubbles change from boiling, it will attain a glossy sheen and texture when it is finished. I usually do a plate test to confirm that its ready. Place a plate in the freezer and drop a little of the jam and tilt it. If it sets then its ready for bottling. Fill the jams in hot and dry sterilized glass jars by placing the hot jars on a tea towel or a wooden board. Leave about 1/2 cm space and wipe the rims of the jar before closing the lid tightly. Cool it, and a vacuum will be formed after several hours, you will hear the lid popping which means it sealed well. A nicely vacuum sealed jam will last up to a year or even more. I have jams which lasted even 2 years in our cellar. Once you open the jam jar store it in the refrigerator. Serving Suggestions Hot Pepper Jelly is incredibly versatile and can be used in numerous ways: Cheese Platters: Serve with cream cheese or goat cheese on crackers for a delightful appetizer.Glaze: Use as a glaze for grilled stuff.Sandwich Spread: Add to sandwiches or burgers for a sweet and spicy kick.Condiment: Use as a dip for spring rolls.Breakfast: Spread on toast, bagels, or scones for a sweet and spicy breakfast treat. Tips to make Pineapple Jam without Pectin If you choose to make pineapple jam without pectin and want more quantity, then add 2:3 sugar to fruit proportion. Which means you add
Homemade Aloe Vera Cream – All Skin Types
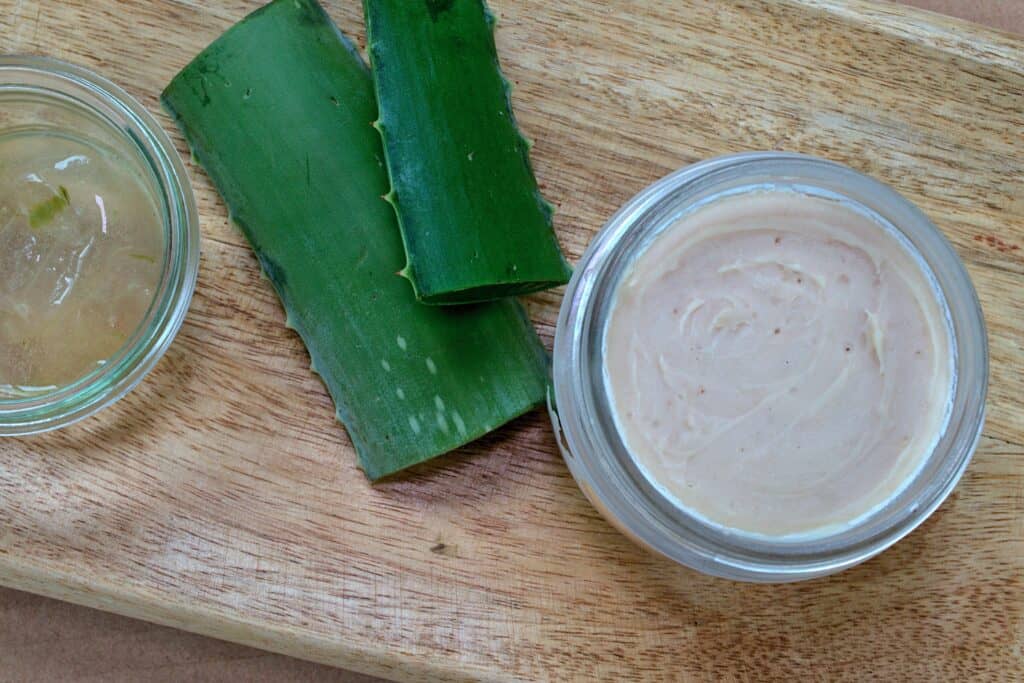
Ingredients Cooking Instructions Jump to Recipe Disclosure: This post contains affiliate links, meaning, at no additional cost to you, we will earn a small commission if you click through and make a purchase. Learn more Home Our skin is our largest detoxification organ therefore what we put on our skin is absorbed into our body. This affects our skin’s health and body health too. This is why it’s incredibly useful to make your own skin care products. Try making this all natural homemade aloe vera cream for your skin. This body cream uses all natural and nourishing ingredients which is suitable for all skin types. Since about a year, I have been intending to share this homemade aloe vera cream recipe. I got the recipe from a good friend on mine, therefore I cannot claim all the credit. But as usual since I couldn’t source all the ingredients, so, I modified the recipe. My first attempt of this cream didn’t work out because I didn’t cut the fresh aloe vera right and was a little too impatient. The second attempt it worked like a dream therefore I wanted to share it on my blog. Table of Contents Aloe Vera the perfect ingredient for skin care Aloe vera is one of the most versatile plants in the world. It has a long history of use for medicinal purposes, and it’s still used to treat a variety of conditions. This plant has its origins in North Africa, and it was introduced to Europe in the 16th century. It became popular as a natural remedy for a variety of illnesses. Aloe vera is still used today to treat skin conditions, such as psoriasis and eczema, and it’s also used to treat other conditions, such as diabetes and asthma. Due to the above and many other properties, Aloe Vera makes an ideal choice for a water based lighter homemade cream. History of Pepper Jelly The Origins of Pepper Jelly: Pepper jelly has its roots in Southern United States cuisine, where preserving fruits and vegetables in jellies and jams has been a longstanding tradition. The idea of combining spicy peppers with sweet jellies is thought to have emerged as a way to use up an abundant pepper harvest and create a versatile condiment that could complement a variety of dishes. Tools you may need Disclosure: This post contains affiliate links, meaning, at no additional cost to you, we will earn a small commission if you click through and make a purchase. Learn more Sterilized Jam Jars Funnel for filling Blender Heavy bottom Pot Mixing bowl How to make Hot and Sweet Pepper Jelly? Ingredients List 1 chopped bell pepper (red or green) 1 cup or 20 finely chopped hot peppers (such as jalapeños, serranos, or habaneros, seeds removed for less heat) 3 cups of pectin sugar 1 cup apple cider vinegar Juice of 1 lemon 1/2 teaspoon salt Cooking Instructions Prepare the Peppers: Wear gloves in order to protect your hands from the heat of the peppers. I have experienced heat on my hands for almost a week because I forgot to wear the gloves once. Remove the stems, seeds, and membranes from the hot peppers (you can leave some seeds if you prefer a spicier jelly). Chop them roughly and then blend it to a rough consistency. Cook the Peppers: Combine the blended peppers after filtering out the excess liquid with pectin sugar, apple cider vinegar, and salt in a thick bottom pot or saucepan. Remove the liquid from the crushed peppers, only if you want the jelly to be thicker, otherwise its not needed. Bring the mixture to a boil over medium-high heat, then reduce the heat and let it simmer for about 10 minutes.Increase the heat and bring the mixture back to a rolling boil. Boil for 1 minute, stirring constantly. Skim the Foam Skim off any foam that forms on the surface of the jelly using a metal spoon. This will help to ensure a clear jelly, if you want a clear jelly. Plate Test Prior to starting the jam, keep a plate in the freezer. Then drop a little of the jelly and see if it has attained the required consistency. Canning the Jelly: Ladle the hot jelly into sterilized jars, leaving about 1 cm of head space at the top. Wipe the rims of the jars with a clean, damp cloth, and apply the lids and screw bands. Process the jars in a boiling water bath for 10 minutes to ensure they are sealed properly. Remove the jars and let them cool completely. Check the seals after 24 hours – the lids should not flex up and down when pressed. Serving Suggestions Hot Pepper Jelly is incredibly versatile and can be used in numerous ways: Cheese Platters: Serve with cream cheese or goat cheese on crackers for a delightful appetizer.Glaze: Use as a glaze for grilled stuff.Sandwich Spread: Add to sandwiches or burgers for a sweet and spicy kick.Condiment: Use as a dip for spring rolls.Breakfast: Spread on toast, bagels, or scones for a sweet and spicy breakfast treat. Tips for the Perfect Hot and Sweet Pepper Jelly Adjusting the Heat: Customize the heat level by adjusting the amount of hot pepper seeds you include.Consistency: Ensure the jelly sets properly by following the boiling times exactly. If you are using Pectin separately, it needs to boil for the correct amount of time to activate and set the jelly.Sterilization: Properly sterilize jars and lids to prevent contamination and ensure a long shelf life. Types of Peppers you can use While jalapeños are the most commonly used pepper for hot pepper jelly, you can experiment with other types to customize the flavor and heat level: Jalapeños: Mild to medium heat, widely available.Serranos: Slightly hotter than jalapeños, with a bright, fresh flavor.Habaneros: Very hot, with a fruity undertone.Bell Peppers: No heat, but adds color and sweetness. Mixing different peppers can create a unique balance of flavors and colors. Flavor Variations
5 Effective Remedies to Digestive Problems
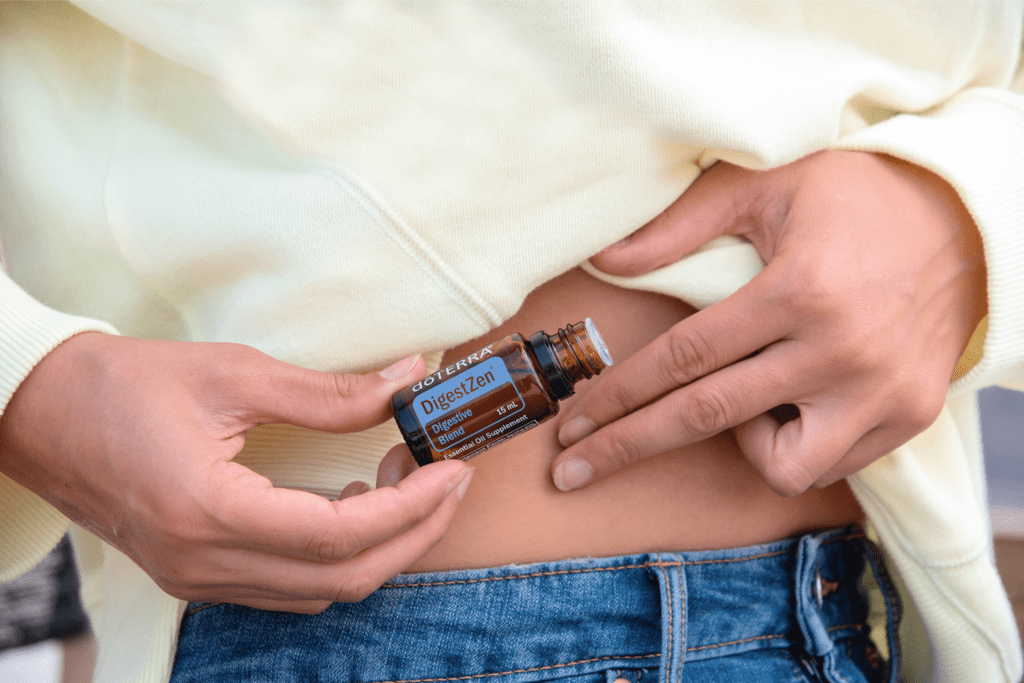
Most of us have experienced stomach distress and digestive issues from time to time. And an equal number of us have probably reached for a standard over-the-counter med. While these have their place, they’re not the only answer to gastrointestinal distress. Many natural remedies exist as well. They’re not only easy on the tummy but often life staples found in your own kitchen. If you’re looking for some easy and effective remedies try these 5 effective remedies to digestive problems you can do at home.
Homemade hand cream

Learn how to make this natural, non-toxic ingredients and infused with essential oils. This natural homemade nourishing hand cream moisturises and revitalises tough, dried out hands during the colder months. Moreover, you can make this with very few ingredients and for the fragrance add essential oils of your choice.
Non-Greasy Face Moisturiser

In the northern hemisphere we are deep into the winter months. And part of my daily skin care routine is to use a non-greasy face moisturiser for dry skin. This homemade face moisturiser is quite simple to make and doesn’t require any fancy equipment. You can whip it up easily and add this moisturiser also into your Christmas gift basket.
Easy Cinnamon Rolls Recipe
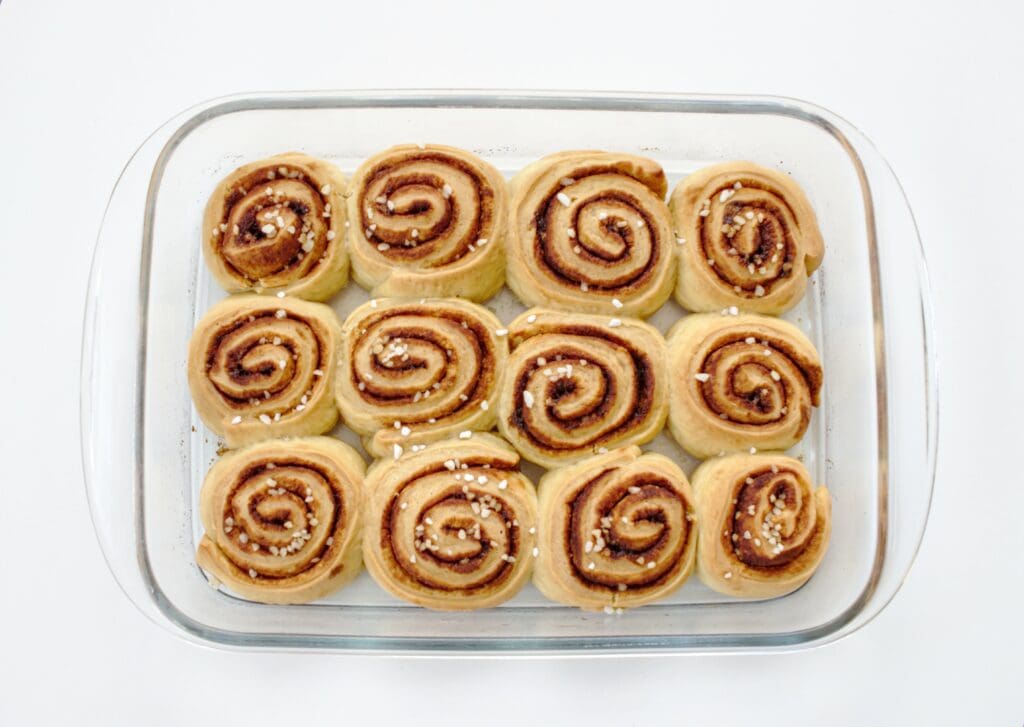
If you have tried cinnamon rolls from IKEA and wanted to make them, then this cinnamon rolls recipe is perfect. What more, you can make them fresh at your whim instead of the frozen and warmed ones from IKEA.
Eggless Sea Buckthorn Muffins
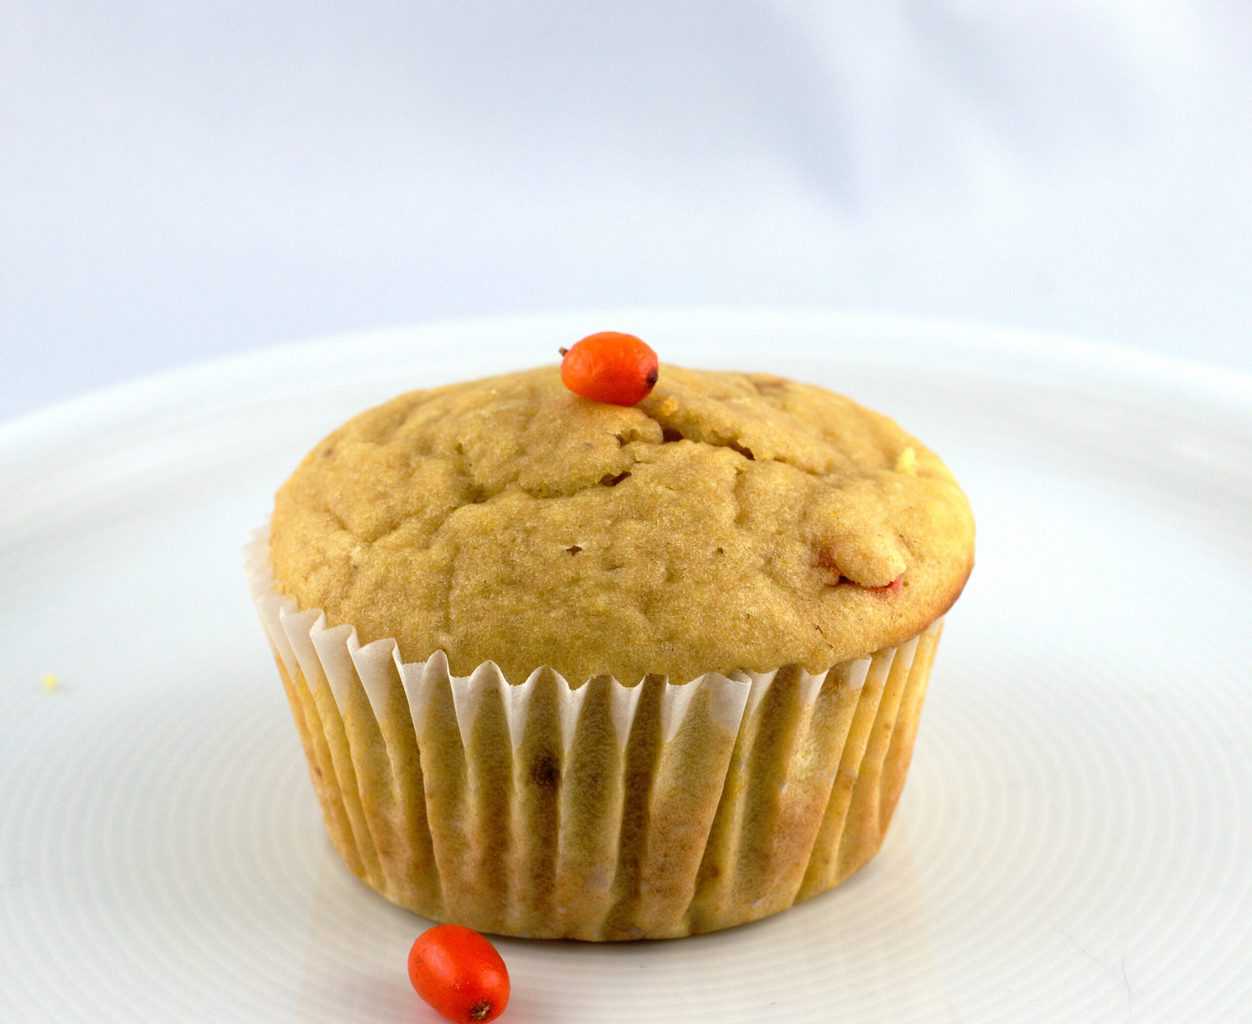
Sea Buckthorns are in season, so why not make a nice tasty and healthy snack for a change with them. I usually make eggless sea buckthorn muffins using spelt flour during our harvest time. Sea buckthorn berries provides dishes with a fresh and fruity twist. But, this powerful berry also has some incredible qualities that may be beneficial to your health as well. Check out my earlier post with Top 10 recipes with Sea Buckthorn berries.
Vanilla Brown Sugar Scrub
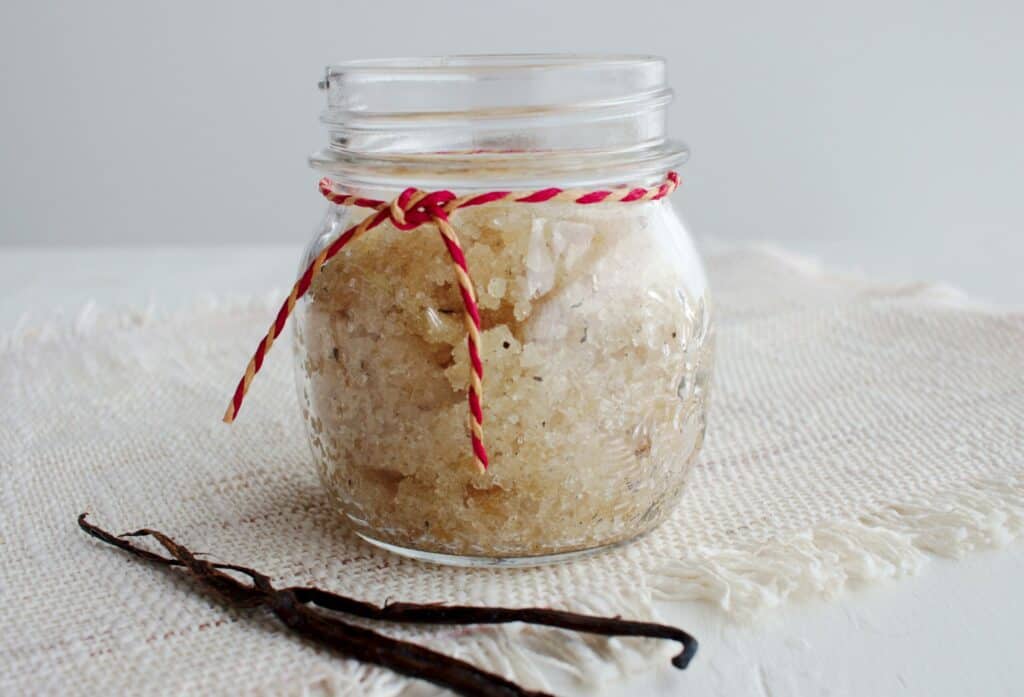
With the winter months fast approaching, why not give your skin the tender loving care it deserves. You can make this homemade vanilla brown sugar scrub with just these 4 ingredients found in your kitchen pantry. This DIY project makes a perfect gift for anyone, or it’s great for pampering yourself.