
Red Currant Crumble Recipe
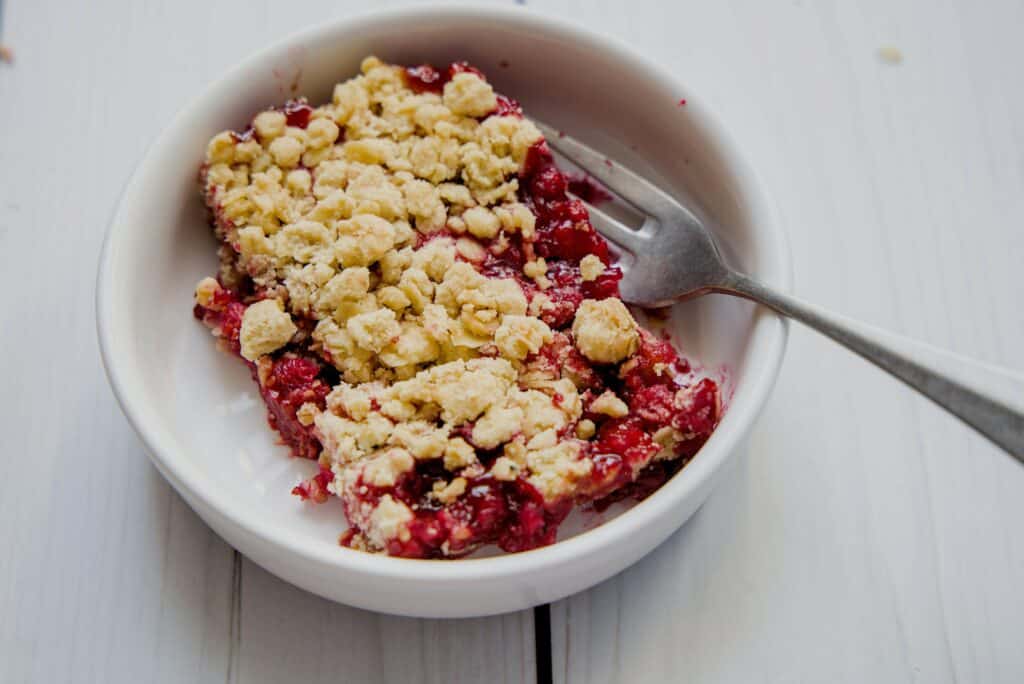
Ingredients Cooking Instructions Jump to Recipe Disclosure: This post contains affiliate links, meaning, at no additional cost to you, we will earn a small commission if you click through and make a purchase. Learn more Home If you’re looking for a dessert recipe, that combines the tartness of red currants with a buttery, sweet crumble topping, then this red currant crumble recipe is the perfect choice. This delightful treat is simple to make and offers a wonderful balance of flavors. What is more, is that you can make this dessert from scratch using ingredients from you pantry. Red currants have a short cultivation season. They ripen over a period of 2 weeks between mid-June to mid-July. Therefore, I make the most of this seasonal berries. We love seasonal and freshly harvested from our own garden. For this recipe, you can also use frozen red currants. In my previous post, I shared 10 Red Currant recipes and one of them was red currant crumble recipe. But, I realized that I forgot to post the recipe, so it was time to add it too. Table of Contents Tools you may need Disclosure: This post contains affiliate links, meaning, at no additional cost to you, we will earn a small commission if you click through and make a purchase. Learn more Glass Baking Dish Mixing bowl How to make Red Currant Crumble? Ingredients List For the filling 500 g redcurrants 100 g sugar 1 tablespoon lemon juice 1 tablespoon cornstarch For the crumble topping 150 g flour 100 g butter (cold, cubed) 50 g oats 50 g brown sugar 1/4 teaspoon salt 1/2 teaspoon cinnamon (optional) Cooking Instructions Preheat your oven to 190°C (375°F ) and grease a baking dish. Prepare the FillingIn a large bowl, combine the red currants, granulated sugar, lemon juice, and cornstarch. Mix well until the currants are evenly coated. Pour the mixture into the prepared baking dish. Make the Crumble ToppingIn another bowl, mix together the flour, rolled oats, brown sugar, salt, and cinnamon (if using). Add the cubed butter and use your fingers to blend the butter into the dry ingredients until the mixture resembles coarse crumbs. Assemble the CrumbleSprinkle the crumble topping evenly over the red currant mixture in the baking dish. Bake in the preheated oven for 35-40 minutes, or until the topping is golden brown and the filling is bubbly. Serve Let the crumble cool for a few minutes before serving. Enjoy it warm with a scoop of vanilla ice cream or a dollop of whipped cream Watch the Video Recipe Card Frequently Asked Questions Can you make Red Currant Crumble Vegan? Yes, you can, substitute the necessary Vegan fat instead of butter. Can you make this gluten free? Yes, just substitute with gluten free options. Leave a ReplyPlease enable JavaScript in your browser to complete this form.Name *Email *Website / URLMessageCheckboxes Yes, add me to your mailing list. Submit Popular Recipes Subscribe Signup for our NewsletterUnlock a world of flavor, creativity, and green living. Subscribe for exclusive recipes, DIY tutorials, and gardening advice.Please enable JavaScript in your browser to complete this form.Name *Email * Submit Popular Recipes
Hot and Sweet Pepper Jelly
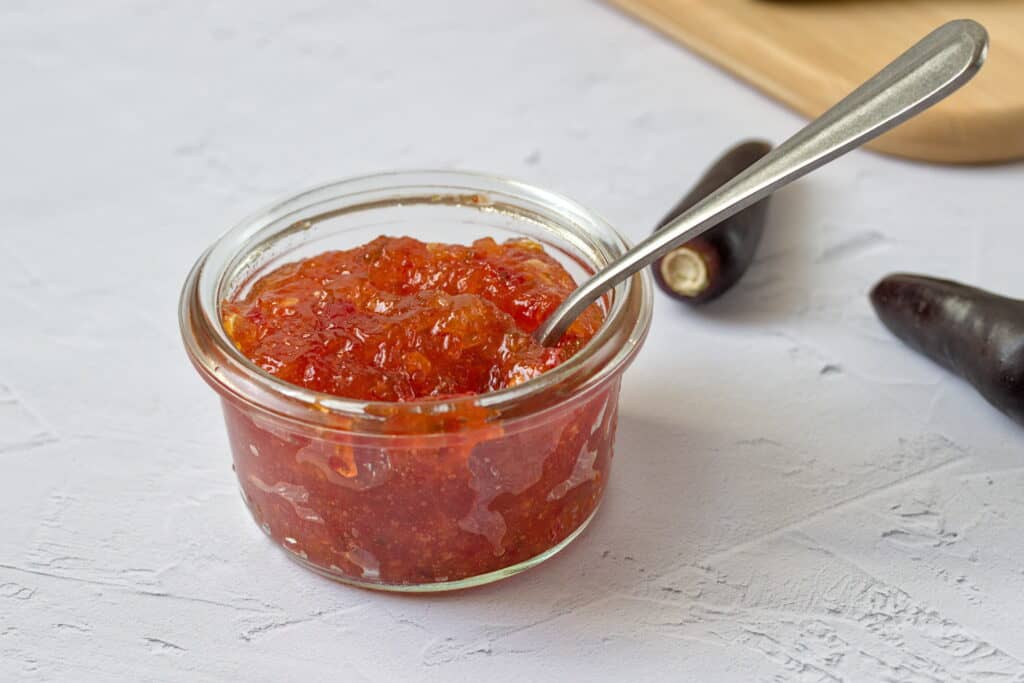
Hot and Sweet Pepper Jelly Ingredients Cooking Instructions Jump to Recipe Home If you’re looking for a unique and flavorful condiment that combines a touch of sweetness with a spicy kick, then this Hot and Sweet Pepper Jelly is the perfect choice. If you’re looking for a unique and flavorful condiment that combines a touch of sweetness with a spicy kick, then this Hot and Sweet Pepper Jelly is the perfect choice. This vibrant jelly is a delightful addition, it pairs well with a variety of dishes from cheese platters to other spreads of your choice. Making your own hot pepper jelly at home is fun. Moreover, it allows you to customize the heat level to your liking. My daughter, of late has got a taste for some spicy condiments. So, I try to make condiments like Fermented hot sauce, hot chili oil and this pepper jelly in order to make it more palatable for her too. Due to lack of time we decided to make them into jams. I will get to that in the second half of this blog post. Table of Contents What is Hot and Sweet Pepper Jelly? Hot Pepper Jelly is a sweet and spicy preserve made from a mix of hot peppers, sugar, and vinegar. The result is a jelly with a beautiful color and a bold flavor that balances sweetness and heat. This versatile condiment can be used as a glaze, spread, or dipping sauce, thus making it a must-have in your kitchen. History of Pepper Jelly The Origins of Pepper Jelly: Pepper jelly has its roots in Southern United States cuisine, where preserving fruits and vegetables in jellies and jams has been a longstanding tradition. The idea of combining spicy peppers with sweet jellies is thought to have emerged as a way to use up an abundant pepper harvest and create a versatile condiment that could complement a variety of dishes. Tools you may need Disclosure: This post contains affiliate links, meaning, at no additional cost to you, we will earn a small commission if you click through and make a purchase. Learn more Sterilized Jam Jars Funnel for filling Blender Heavy bottom Pot Mixing bowl How to make Hot and Sweet Pepper Jelly? Ingredients List 1 chopped bell pepper (red or green) 1 cup or 20 finely chopped hot peppers (such as jalapeños, serranos, or habaneros, seeds removed for less heat) 3 cups of pectin sugar 1 cup apple cider vinegar Juice of 1 lemon 1/2 teaspoon salt Cooking Instructions Prepare the Peppers: Wear gloves in order to protect your hands from the heat of the peppers. I have experienced heat on my hands for almost a week because I forgot to wear the gloves once. Remove the stems, seeds, and membranes from the hot peppers (you can leave some seeds if you prefer a spicier jelly). Chop them roughly and then blend it to a rough consistency. Cook the Peppers: Combine the blended peppers after filtering out the excess liquid with pectin sugar, apple cider vinegar, and salt in a thick bottom pot or saucepan. Remove the liquid from the crushed peppers, only if you want the jelly to be thicker, otherwise its not needed. Bring the mixture to a boil over medium-high heat, then reduce the heat and let it simmer for about 10 minutes.Increase the heat and bring the mixture back to a rolling boil. Boil for 1 minute, stirring constantly. Skim the Foam Skim off any foam that forms on the surface of the jelly using a metal spoon. This will help to ensure a clear jelly, if you want a clear jelly. Plate Test Prior to starting the jam, keep a plate in the freezer. Then drop a little of the jelly and see if it has attained the required consistency. Canning the Jelly: Ladle the hot jelly into sterilized jars, leaving about 1 cm of head space at the top. Wipe the rims of the jars with a clean, damp cloth, and apply the lids and screw bands. Process the jars in a boiling water bath for 10 minutes to ensure they are sealed properly. Remove the jars and let them cool completely. Check the seals after 24 hours – the lids should not flex up and down when pressed. Serving Suggestions Hot Pepper Jelly is incredibly versatile and can be used in numerous ways: Cheese Platters: Serve with cream cheese or goat cheese on crackers for a delightful appetizer.Glaze: Use as a glaze for grilled stuff.Sandwich Spread: Add to sandwiches or burgers for a sweet and spicy kick.Condiment: Use as a dip for spring rolls.Breakfast: Spread on toast, bagels, or scones for a sweet and spicy breakfast treat. Tips for the Perfect Hot and Sweet Pepper Jelly Adjusting the Heat: Customize the heat level by adjusting the amount of hot pepper seeds you include.Consistency: Ensure the jelly sets properly by following the boiling times exactly. If you are using Pectin separately, it needs to boil for the correct amount of time to activate and set the jelly.Sterilization: Properly sterilize jars and lids to prevent contamination and ensure a long shelf life. Types of Peppers you can use While jalapeños are the most commonly used pepper for hot pepper jelly, you can experiment with other types to customize the flavor and heat level: Jalapeños: Mild to medium heat, widely available.Serranos: Slightly hotter than jalapeños, with a bright, fresh flavor.Habaneros: Very hot, with a fruity undertone.Bell Peppers: No heat, but adds color and sweetness. Mixing different peppers can create a unique balance of flavors and colors. Flavor Variations of Sweet and Hot Pepper Jelly Although, the basic recipe is delicious, you can experiment with different ingredients to create unique flavor profiles: Fruit Additions: Try adding crushed pineapple, mango, or apricots for a fruity twist.Herbs: Fresh herbs like rosemary or thyme can add an aromatic depth.Spices: Add a pinch of cinnamon, cloves, or allspice for a warm spicy note. Health Benefits Peppers are rich in vitamins A and C, potassium,
Hot Chili Oil

Hot chili oil is a must-have condiment for anyone who loves bold flavors and a bit of heat. Making it at home allows you to create a version that’s perfectly suited to your taste preferences. Whether you’re adding a drizzle to your favorite dishes or using it as a dipping sauce, this spicy oil is sure to become a kitchen staple.
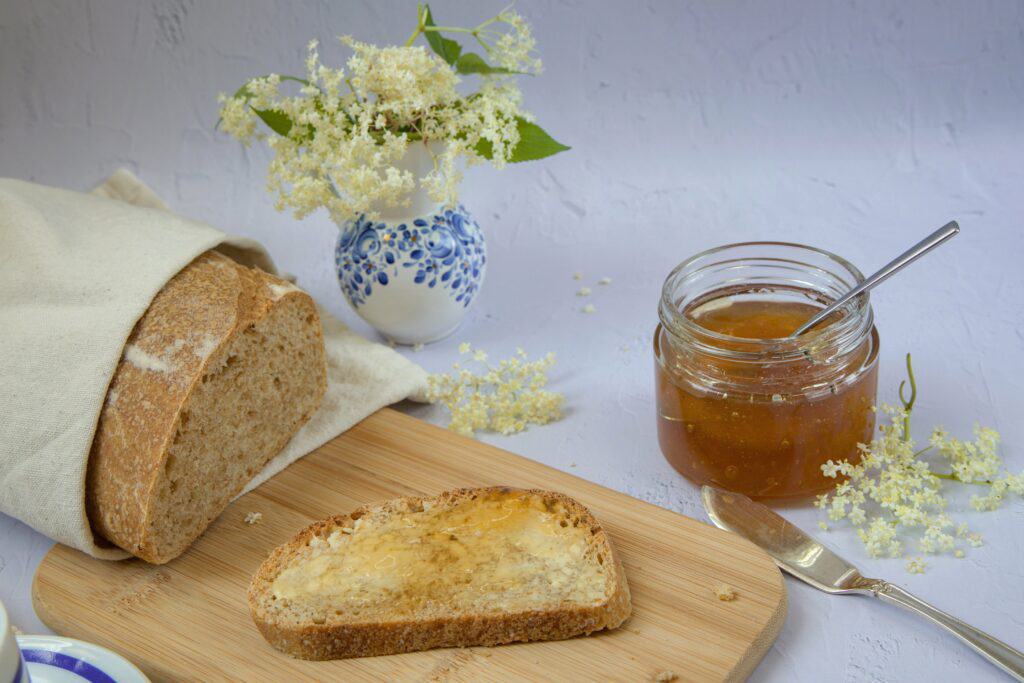
10 Easy Red Currant Recipes
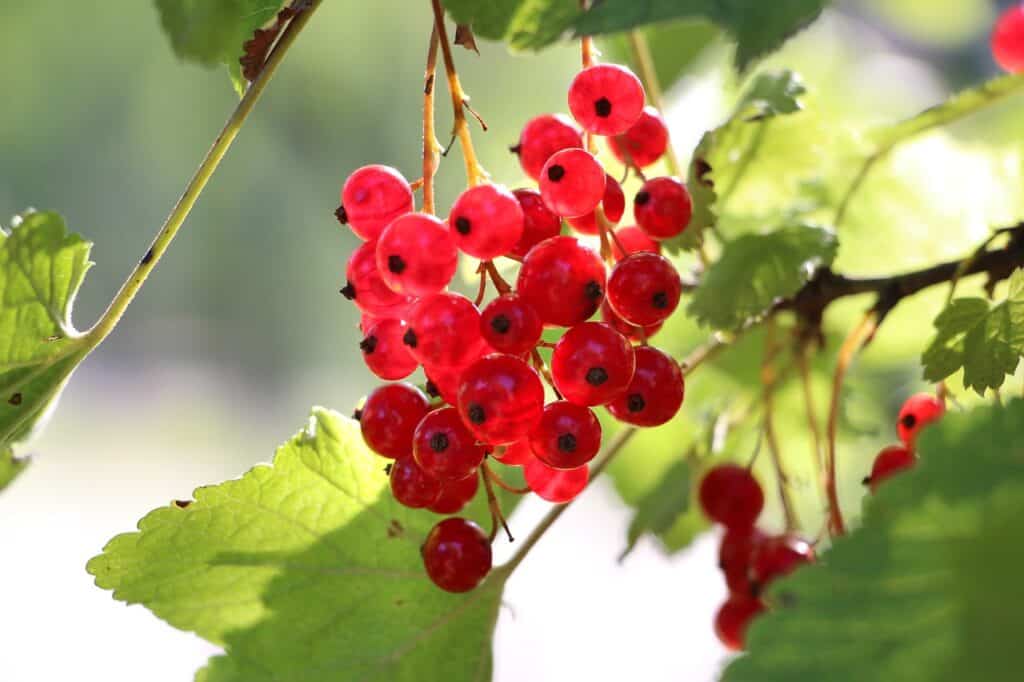
Redcurrants are versatile and can be used in a variety of recipes, both sweet and savory. Here are a few delicious redcurrant recipes to try.
Gluten Free Cucumber Idli
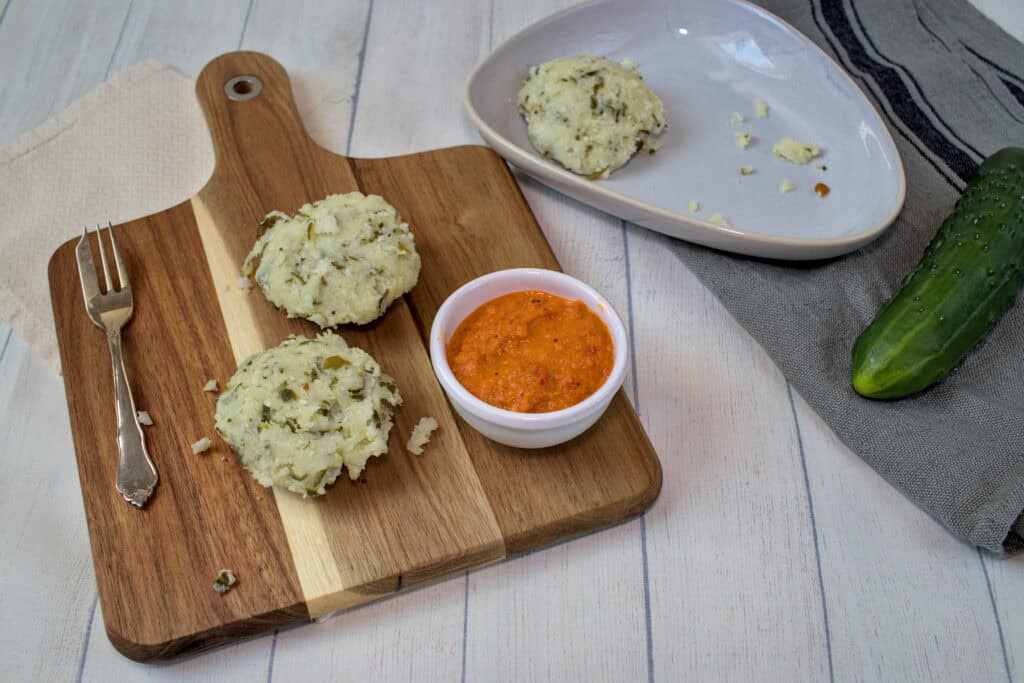
Ingredients Cooking Instructions Jump to Recipe Disclosure: This post contains affiliate links, meaning, at no additional cost to you, we will earn a small commission if you click through and make a purchase. Learn more Home South Indian cuisine offers a delightful array of breakfast options that are both nutritious and delicious. One such gem is this instant gluten free Cucumber Idli, a unique twist on the traditional rice idli. This idli is made with the fresh hydrating goodness of cucumber. Moreover these idlies are light, fluffy, and perfect. Even if you are new to Indian cuisine, this recipe is easy to follow and yields delightful results. Additionally, this idli doesn’t require any fermentation. With cucumber in season during the summer months, I have so many cucumbers, that I have to be really creative to use them up. They are not so good for long term storage. Last year, we tried pressure canning the cucumbers, but no one really likes to eat canned stuff at home, so will not do that process anymore. Some of the ways I use cucumbers is in salads on a regular basis. Another way is to ferment cucumbers using the lacto-fermentation method. On the other hand, there is only so much of fermented cucumbers one can eat. Therefore, this gluten free cucumber idli ticks some more boxes for my family, since my daughter is gluten free. Table of Contents Tips for making Perfect Cucumber Idlies Use fresh, firm cucumbers for the best texture and flavor. English cucumbers or Persian cucumbers work well, I use the Nostrano variety. Ensure the batter is not too runny or too thick. It should be pourable but hold its shape. Allowing the batter to rest is crucial for soft idlies. Don’t skip this step. Avoid opening the steamer lid frequently during the cooking process to ensure even cooking. Tools you may need Disclosure: This post contains affiliate links, meaning, at no additional cost to you, we will earn a small commission if you click through and make a purchase. Learn more Idly Stand Mixing bowl Vegetable Grater Ingredients List 3 cups grated organic cucumber (with skin) 1 1/2 cup slightly roasted idly rava (cream of rice available in Indian Stores) 1/2 cup grated coconut 4 Tbsp of thick yogurt 1/2 teaspoon baking soda 2 tsp Salt Oil for greasing idly molds Fresh coriander leaves (optional, for garnish) For Seasoning : 1 tsp gram dhal, 1 tsp urad dhal, 1 tsp of mustard seeds and pinch of asafoedita Cooking Instructions Prepare the Batter Gluten Free Cucumber Idli batter: Wash the cucumbers thoroughly. Grate them with the skin on for added nutrition and flavor. Combine the grated cucumber, idly rava, grated coconut, and yogurt in a large mixing bowl. Mix well until all the ingredients are thoroughly combined. The moisture from the cucumber should be enough to hydrate the idly rava. If the batter looks too thick, you can add a little water to reach the desired consistency. Add salt to taste and mix again. Cover the bowl and let the batter rest for about 30 minutes. This resting period allows the idly rava to soak up the moisture and soften. Heat 1 tbsp of oil and season. Prepare the Steamer: While the batter is resting, prepare your idly steamer. Add water to the base of the steamer and bring it to a boil. Grease the idly molds lightly with oil to prevent sticking. Add Baking Soda: Just before steaming, add the baking soda to the batter. Mix gently but thoroughly. The baking soda helps the idlies become soft and fluffy. Steam the Idlis: Pour the batter into the greased idly molds, filling each mold about 3/4 full to allow room for the idlies to rise. Place the molds in the steamer and cover with a lid. Steam the idlies on medium-high heat for about 15-20 minutes or until a toothpick inserted into the center comes out clean. Once done, remove the idly molds from the steamer and let them cool for a few minutes. Unmold and Serve: Use a spoon to gently scoop the idlies out of the molds. Garnish with fresh coriander leaves if desired. Cucumber Idli Serving Suggestions Cucumber Idlies are best enjoyed hot, straight out of the steamer. You can serve cucumber Idli with Chutney: Idlis are usually served with coconut chutney, mint chutney, or tomato chutney for a burst of flavors. Sambar: Serve alongside a bowl of steaming sambar for a hearty and satisfying meal. Pickles: Indian pickles adds a tangy and spicy kick to the mild idlies. As Is: Because, these idlies are so flavorful on their own, they can be enjoyed plain with a little ghee on top, as a light and refreshing snack. In case you don’t have Idli molds Grease a container and pour the idli in it and steam. I have made idlies in pudding bowls too and it has worked. Recipe Card Frequently Asked Questions Accordion Tab Title 1 Click edit button to change this text. Lorem ipsum dolor sit amet, consectetur adipiscing elit. Ut elit tellus, luctus nec ullamcorper mattis, pulvinar dapibus leo. Accordion Tab Title 2 Click edit button to change this text. Lorem ipsum dolor sit amet, consectetur adipiscing elit. Ut elit tellus, luctus nec ullamcorper mattis, pulvinar dapibus leo. Accordion Tab Title 3 Click edit button to change this text. Lorem ipsum dolor sit amet, consectetur adipiscing elit. Ut elit tellus, luctus nec ullamcorper mattis, pulvinar dapibus leo. Leave a ReplyPlease enable JavaScript in your browser to complete this form.Name *Email *Website / URLMessageCheckboxes Yes, add me to your mailing list. Submit Popular Recipes Subscribe Signup for our NewsletterUnlock a world of flavor, creativity, and green living. Subscribe for exclusive recipes, DIY tutorials, and gardening advice.Please enable JavaScript in your browser to complete this form.Name *Email * Submit Popular Recipes
Easy Elderflower Jelly (or Jam) Recipe
Ingredients Cooking Instructions Jump to Recipe Disclosure: This post contains affiliate links, meaning, at no additional cost to you, we will earn a small commission if you click through and make a purchase. Learn more Home If you’re looking for a unique and flavorful condiment that combines a touch of sweetness with a spicy kick, then this Hot and Sweet Pepper Jelly is the perfect choice. In our cozy corner of the internet, we aim to share easy and delicious recipes that bring your garden produce into your kitchen. One of our favorites is everything to do with Elderflower. This easy Elderflower Jelly (or Jam ) recipe captures the delicate and floral aroma of elderflowers. This Elderflower Jelly (Jam) recipe is sure to enchant your senses and become a favorite in your home, it has become one of my favorites anyway. Table of Contents What is Elderflower? Elderflower comes from the elderberry tree, which blooms with beautiful clusters of tiny, creamy-white flowers in late spring to early summer. These flowers have been used for centuries in various culinary and medicinal applications. Their light, floral flavor makes them an excellent addition to desserts, drinks, and, of course, jams. When making Elderflower Jam, it’s essential to harvest the flowers at their peak to capture their full essence. When is the best time to harvest Elderflowers? Since, elderflower season is short, we have to pick them quickly about just the time they bloom. In my older posts, I have shared a couple of Elderflower recipes – Elderflower Cordial, and Elderflower Mint Syrup which are refreshing summer drinks. Otherwise, they turn to berries. On the other hand, with the berries you can make a jam, compote, or make an immune boosting cold and flu syrup. The best time to pick the flowers is between late May to June. This also depends on the sub-climate in each zone of Europe. Choose a sunny day to harvest your elderflowers, preferably in the morning when their scent is the strongest. Tools you may need Disclosure: This post contains affiliate links, meaning, at no additional cost to you, we will earn a small commission if you click through and make a purchase. Learn more Big stainless steel sauce pan. Sterilized Jam Jars Funnel for filling Heavy bottom Pot Mixing bowl How to make Elderflower Jam Recipe? Ingredients List 3 Cups of Elderflowers removed from the stalks 3 cups of Pectin sugar 3 cups of Apple Juice Juice of a lemon Cooking Instructions Harvesting Elderflowers Choose a sunny day to harvest your elderflowers, preferably in the morning when their scent is the strongest. Gently shake the flower heads to remove any insects and avoid washing them, as this can dilute their flavor. Instead, inspect them carefully and clean if necessary. On the other hand, if you want to wash them, just shortly run them under running water.Snip the flower heads just below the blossoms, removing as much of the green stems as possible. Prepare the ElderflowersPlace the elderflower heads in a large bowl and pour the apple juice over them.Add the lemon juice to the bowl. Or you can add the juice while making the jam too.Cover the bowl with a clean cloth and let it sit for 24-48 hours to allow the flavors to infuse. How to make Elderflower Jelly (or Jam)After infusing the flower, strain the liquid through a fine-mesh sieve or cheesecloth into a large pot. Discard the spent flowersAdd the pectin sugar to the pot and stir well to dissolve. In case you are using normal sugar and adding pectin separately, follow the instructions on the pectin package.Bring the mixture to a boil over medium-high heat, stirring frequently.Reduce the heat and let the mixture simmer for about 15-20 minutes, or until it reaches a thick, jam-like consistency. You can test this by placing a small spoonful on a chilled plate, if it gels and holds its shape then it’s ready to be bottled. Canning the finished Elderflower JellyWhile the jam is simmering, sterilize your jars and lids by boiling them in water for 10 minutes.Carefully ladle the hot jam into the sterilized jars, leaving about 1/4 inch of headspace at the top.Wipe the rims of the jars with a clean, damp cloth to remove any residue, then seal with the lids.Process the jars in a boiling water bath for 10 minutes to ensure a proper seal.Remove the jars from the water bath and let them cool completely. You should hear a “pop” as the lids seal. How long can you store your Elderflower Jelly? Store your cooled in a cool and dark place. I usually store my jams in our celler which is cooler. Because, our cellar is cool and dark this Elderflower jelly will keep for a year. Once opened, store the jam in the refrigerator and use it within a few weeks. Elderflower Jelly (or Jam) Serving Tips Elderflower Jam is a versatile and delightful treat. We spread our elderflower jelly on our homemade bread toasts, scones and pancakes. Other possible uses are to use it as a filling for cakes and pastries. Moreover, I love to add all of my homemade jams and jelly’s into gift baskets. Watch the Video Recipe Card Your feedback is valuable If you try this recipe and love it, I would love if you come back and gave it 5 stars! Thank you so much for visiting Vial Fair Living – we’re so happy you’re here! I would love it if you can share this recipe using the social media buttons you see next to the post. Frequently Asked Questions Accordion Tab Title 1 Click edit button to change this text. Lorem ipsum dolor sit amet, consectetur adipiscing elit. Ut elit tellus, luctus nec ullamcorper mattis, pulvinar dapibus leo. Accordion Tab Title 2 Click edit button to change this text. Lorem ipsum dolor sit amet, consectetur adipiscing elit. Ut elit tellus, luctus nec ullamcorper mattis, pulvinar dapibus leo. Accordion Tab Title 3 Click edit button to
Elderflower Mint Cordial Recipe
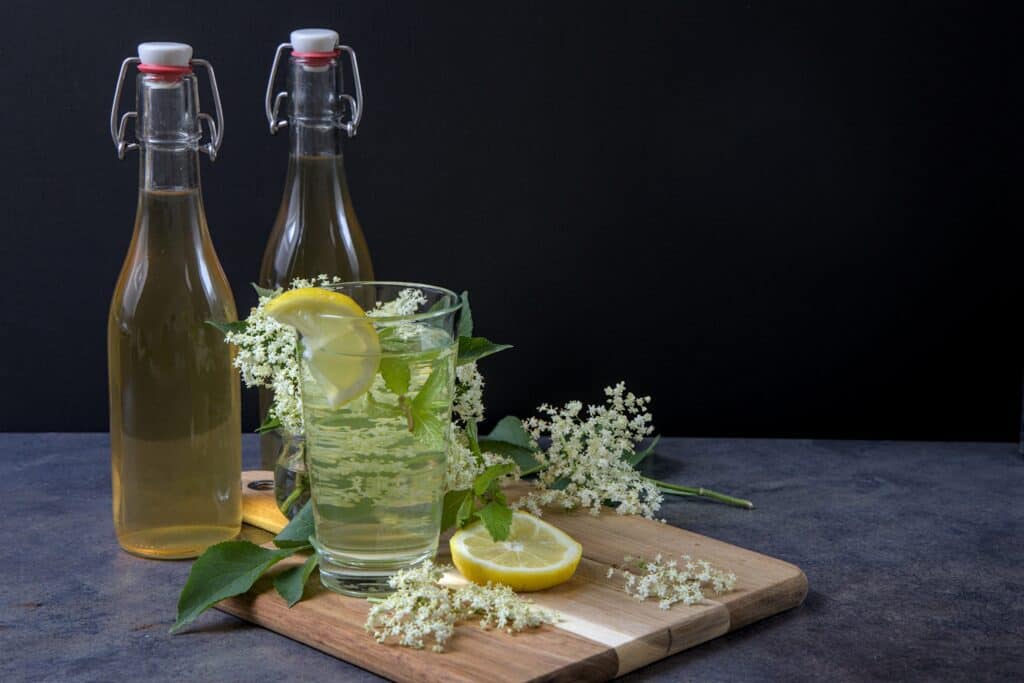
Ingredients Cooking Instructions Jump to Recipe Disclosure: This post contains affiliate links, meaning, at no additional cost to you, we will earn a small commission if you click through and make a purchase. Learn more Home Elderflower and mint are a match made in heaven. Elderflower mint cordial recipe is fragrant, refreshing, and perfect for summer beverages. This versatile cordial can be used to flavor cocktails, mocktails, teas, lemonades, and even desserts. In this blog post, I’ll guide you through the simple steps to make your own elderflower mint cordial at home, capturing the essence of these delightful herbs. This recipe is similar to my other plain Elderflower Cordial recipe, moreover its easy to make. Since, I have an abundance of both mint and elderflowers growing in my back yard, I didn’t need to forage them. Elderflower bushes are native to Europe and they grow wild. Although, I have a few bushes and we do not pick all the berries or flowers for our own use. We always leave a good quantity of the berries for the birds to forage too. Table of Contents Picking Elder Flowers Since, the elderflower season is short, we have to pick them quickly about just the time they bloom. Otherwise, they turn to berries. On the other hand, with the berries you can make a jam, compote, or make an immune boosting cold and flu syrup. The best time to pick the flowers is between late May to June. This also depends on the sub-climate in each zone of Europe. Tools you may need Disclosure: This post contains affiliate links, meaning, at no additional cost to you, we will earn a small commission if you click through and make a purchase. Learn more Big stainless steel sauce pan. Sterilized swing top glass bottles Muslin Cheese Cloth How to make Elderflower Mint Cordial Recipe? Ingredients List 1 cup fresh elderflowers (about 10-15 large flower heads) 1 cup fresh mint leaves 4 cups water 4 cups granulated sugar 2 lemons, sliced 1 tablespoon citric acid (optional, for preserving) Instructions Prepare the Elderflowers and MintGently rinse the elderflower heads to remove any dirt or insects. Shake off the excess water and remove the thick stems.Rinse the mint leaves thoroughly. Make the Syrup BaseIn a large pot, combine the water and sugar. Heat over medium heat, stirring occasionally, until the sugar has completely dissolved.Once the sugar is dissolved, bring the mixture to a gentle boil and remove from heat. Infuse with Elderflower and MintAdd the elderflowers and mint leaves to the hot syrup.Add the sliced lemons and citric acid (if using) to the mixture.Stir well to combine, ensuring that the flowers and leaves are submerged in the syrup. Steep the MixtureCover the pot with a lid and let the mixture steep at room temperature for 24-48 hours. The longer you steep, the stronger the flavor of the cordial. Strain the SyrupAfter steeping, strain the syrup through a fine-mesh sieve or cheesecloth into a clean bowl or jug. Press the solids to extract as much liquid as possible and discard the solids. Store the SyrupPour the strained syrup into sterilized bottles or jars. Seal tightly.Store in the refrigerator, where it will keep for about 1-2 months. Serving Suggestions Elderflower Mint Lemonade: Mix the syrup with fresh lemon juice, water, and ice for a refreshing summer drink. Cocktails: Add a splash of the syrup to gin or vodka with soda water for a delightful elderflower mint cocktail. Iced Tea: Sweeten your iced tea with a drizzle of elderflower mint syrup for a floral twist. Desserts: Drizzle over cakes, pancakes, or ice cream for an aromatic enhancement. Refreshing Elderflower Mint Syrup Recipe Card Your feedback is valuable If you try this recipe and love it, I would love if you come back and gave it 5 stars! Thank you so much for visiting Vial Fair Living – we’re so happy you’re here! I would love it if you can share this recipe using the social media buttons you see next to the post. Frequently Asked Questions Accordion Tab Title 1 Click edit button to change this text. Lorem ipsum dolor sit amet, consectetur adipiscing elit. Ut elit tellus, luctus nec ullamcorper mattis, pulvinar dapibus leo. Accordion Tab Title 2 Click edit button to change this text. Lorem ipsum dolor sit amet, consectetur adipiscing elit. Ut elit tellus, luctus nec ullamcorper mattis, pulvinar dapibus leo. Accordion Tab Title 3 Click edit button to change this text. Lorem ipsum dolor sit amet, consectetur adipiscing elit. Ut elit tellus, luctus nec ullamcorper mattis, pulvinar dapibus leo. Leave a ReplyPlease enable JavaScript in your browser to complete this form.Name *Email *Website / URLMessageCheckboxes Yes, add me to your mailing list. Submit Popular Recipes Subscribe Signup for our NewsletterUnlock a world of flavor, creativity, and green living. Subscribe for exclusive recipes, DIY tutorials, and gardening advice.Please enable JavaScript in your browser to complete this form.Name *Email * Submit Popular Recipes
Gulab Jamun from Milk Powder
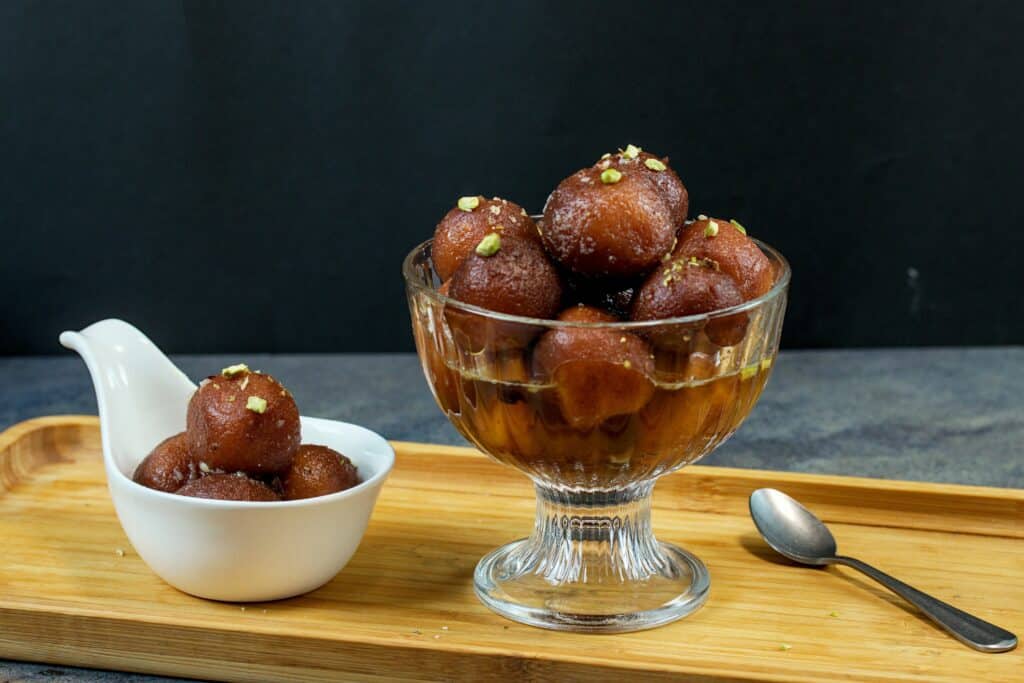
Ingredients Cooking Instructions Jump to Recipe Disclosure: This post contains affiliate links, meaning, at no additional cost to you, we will earn a small commission if you click through and make a purchase. Learn more Home Homemade Gulab Jamun with milk powder is a delightful treat that captures the essence of Indian cuisine. With this easy recipe, you can recreate the magic of this beloved dessert in your own kitchen. Whether it’s a festive occasion or a dinner party, Gulab Jamun never fails to bring joy and satisfaction to your taste buds. During my recent trip to India, I was treated to Gulab Jamoons in restaurants and weddings. You can find ready mixes to make this. Although, its easy its not the same as making from scratch. The best recipe, I could replicate my mother’s recipe, was given to me by my good friend. I make this homemade gulab jamun from milk powder mostly for festivals. Although on occasion even for birthdays. It was a standard birthday treat during my childhood. Table of Contents What is Gulab Jamun? Gulab Jamun, is a quintessential Indian dessert. It embodies warmth, sweetness, and pure indulgence. Crafting these soft, syrup-soaked delights at home is not just a culinary endeavor but an experience of love and tradition. My mother was famously known for her gulab jamuns in our family. And she used to take it with her when she visited her relatives and friends. The difference in her recipe to mine was that she always made it from raw milk. But these days, who has the time to cook down milk for a couple of hours to make gulab jamuns. So, any short cut is welcome. My husband in his early days of learning Indian cuisine, said the first dessert he learnt to make was Gulab Jamun. He always made Gulab Jamuns made with milk powder. It was only then, I figured out that was possiblity. Tools you may need Disclosure: This post contains affiliate links, meaning, at no additional cost to you, we will earn a small commission if you click through and make a purchase. Learn more Cast Iron Wok Mixing Bowl Colander Strainer Ladle How to make Gulab Jamun from Milk Powder? Ingredients List 1 cup milk powder 1 cup self raising flour 1 cup full fat cream 2 tbsp ghee (clarified butter) A pinch of cardamom powder Ghee for frying For the sugar syrup 1.5 cups sugar 1.5 cups water A few saffron strands (optional) 1/2 tsp of cardamon powder only from the seeds 2 tbsp pure rose water Cooking Instructions Preparing the Sugar Syrup: In a saucepan, combine sugar and water. Bring it to a boil, stirring until the sugar dissolves completely. Add saffron strands, cardamom powder and rose water for an aromatic flavor. Simmer the syrup for about 5-7 minutes until it thickens slightly. Keep it warm. Making Gulab Jamun: In a mixing bowl, combine milk powder, self raising flour and the full fat cream. Add ghee and mix well until the mixture resembles breadcrumbs. Gradually add milk and knead gently to form a soft dough. Be careful not to over-knead. Cover the dough with a damp cloth and let it rest for 10-15 minutes. Divide the dough into equal-sized portions and roll them into smooth, crack-free balls. Ensure there are no cracks, as they may cause the Gulab Jamun to break while frying. Keep the size of the balls small, as they will expand slightly after frying and soaking in the syrup. Fry Gulab Jamuns Heat ghee in a deep pan over medium heat. The temperature should be moderate but not too high. Gently slide the rolled Gulab Jamun balls into the hot ghee, one by one, without overcrowding the pan. Fry them on low to medium heat, stirring gently and continuously for even browning, till they turn golden brown. Remove them from the ghee and drain excess by placing them on a paper towel. Soak Gulab Jamuns in Sugar Syrup: While the Gulab Jamuns are still warm, carefully drop them into the warm sugar syrup. Let them soak for at least 1-2 hours, this allows the Gulab Jamun to absorb the syrup and become soft and spongy. Serving Suggestions Garnish with chopped nuts like almonds, pistachios if desired. Serve warm or at room temperature. Gulab Jamun taste best after they are soaked overnight. Tips for making Perfect Gulab Jamuns There is a big difference in flavor if the gulab jamuns are fried in oil or ghee. The best taste comes from frying in ghee. Moreover, ghee can withstand higher temperature for frying. Watch the Video Recipe Card Your feedback is valuable If you try this recipe and love it, I would love if you come back and gave it 5 stars! Thank you so much for visiting Vial Fair Living – we’re so happy you’re here! I would love it if you can share this recipe using the social media buttons you see next to the post. Frequently Asked Questions Accordion Tab Title 1 Click edit button to change this text. Lorem ipsum dolor sit amet, consectetur adipiscing elit. Ut elit tellus, luctus nec ullamcorper mattis, pulvinar dapibus leo. Accordion Tab Title 2 Click edit button to change this text. Lorem ipsum dolor sit amet, consectetur adipiscing elit. Ut elit tellus, luctus nec ullamcorper mattis, pulvinar dapibus leo. Accordion Tab Title 3 Click edit button to change this text. Lorem ipsum dolor sit amet, consectetur adipiscing elit. Ut elit tellus, luctus nec ullamcorper mattis, pulvinar dapibus leo. Leave a ReplyPlease enable JavaScript in your browser to complete this form.Name *Email *Website / URLMessageCheckboxes Yes, add me to your mailing list. Submit Popular Recipes Subscribe Signup for our NewsletterUnlock a world of flavor, creativity, and green living. Subscribe for exclusive recipes, DIY tutorials, and gardening advice.Please enable JavaScript in your browser to complete this form.Name *Email * Submit Popular Recipes
Eggless Blueberry Muffins Recipe
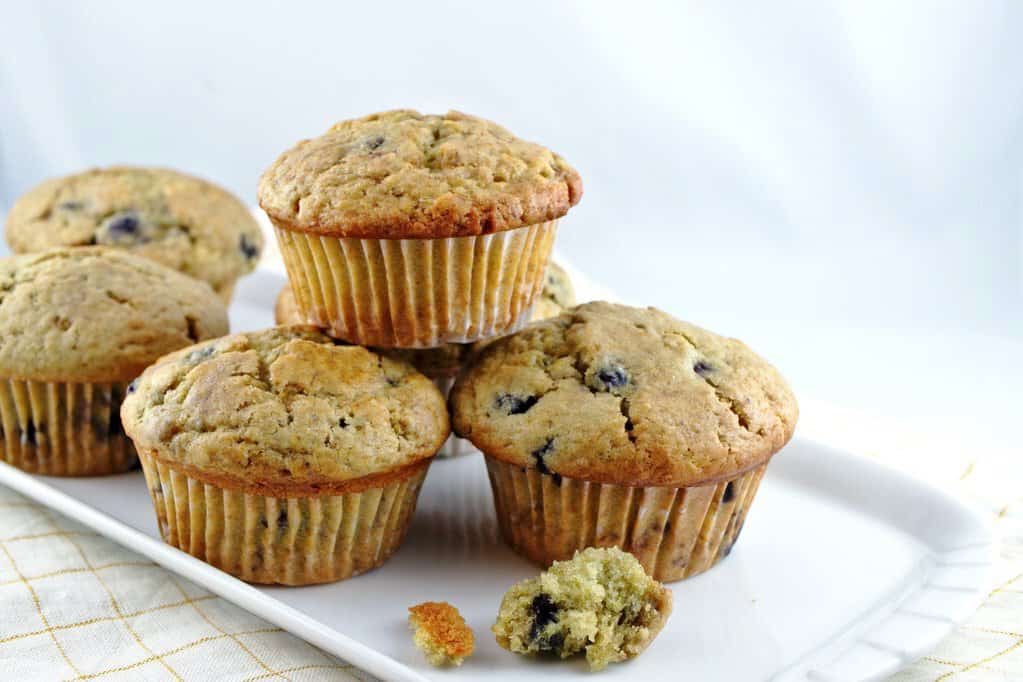
Ingredients Cooking Instructions Jump to Recipe Disclosure: This post contains affiliate links, meaning, at no additional cost to you, we will earn a small commission if you click through and make a purchase. Learn more Home Muffins have a unique charm—they’re versatile, easy to make, and undeniably delicious. And when it comes to blueberry muffins, they hold a special place in the hearts of many. If you’re looking for an eggless version of the Blueberry Muffin, then this is the recipe for you. You can still achieve that fluffy texture and burst of fruity flavor without the eggs. In this blog post, we’ll dive into a delightful eggless blueberry muffins recipe that will leave you craving for more. Table of Contents Why we love this Eggless Blueberry Muffins? I have in my previous posts shared a couple of Eggless Muffin Recipes. But you know Seabuckthorn muffins are a little difficult for children to like because of the sour taste. I have also shared a Vegan Banana Muffin recipe years back. Bananas are not my daughter’s favorite, so it was a treat for us parents only. Therefore, this eggless blueberry muffins recipe comes to the rescue, it is a hit with adults and children alike. My daughter would rather eat something sweeter than sour stuff. Moreover, we have planted a couple of blueberry bushes. Soon, it will be blueberry season and hopefully this year we will have an abundance of berries. Of course, I would rather eat them as soon as it ripens, but muffins are a great treat and an easy snack to indulge in. Tools you may need Disclosure: This post contains affiliate links, meaning, at no additional cost to you, we will earn a small commission if you click through and make a purchase. Learn more Muffin Tins Mixing Bowl Dough Whisk How to make Eggless Blueberry Muffins? Ingredients List 1½ cups all-purpose flour or (188 g ) ¾ cup granulated sugar or (150 g ) ½ cup unsweetened applesauce or ( 118 ml ) ½ cup milk (plant-based milk like almond or soy works too) or ( 118 ml ) ⅓ cup vegetable oil or (79 ml ) 1 teaspoon vanilla extract 1 teaspoon baking powder ½ teaspoon baking soda ½ teaspoon salt 1 cup fresh blueberries (or frozen, thawed, and drained) Cooking Instructions Preheat your oven to 375°F (190°C). Line a muffin tin with paper liners or grease them lightly with oil. In a large mixing bowl, whisk together the flour, sugar, baking powder, baking soda, and salt until well combined. In another bowl, combine the applesauce, milk, vegetable oil, and vanilla extract. Mix until smooth and well incorporated. Pour the wet ingredients into the dry ingredients and stir until just combined. Be careful not to overmix, as this can result in dense muffins. Gently fold in the blueberries until evenly distributed throughout the batter. Spoon the batter into the prepared muffin tin, filling each cup about ¾ full. Bake in the preheated oven for 18-20 minutes, or until the muffins are golden brown and a toothpick inserted into the center comes out clean. Remove the muffins from the oven and allow them to cool in the tin for a few minutes before transferring them to a wire rack to cool completely. Once cooled, serve and enjoy your eggless blueberry muffins! They’re perfect for breakfast, brunch, or as a sweet treat any time of day. Tips for Perfect Eggless Blueberry Muffins If using frozen blueberries, toss them in a tablespoon of flour before adding them to the batter. This helps prevent them from sinking to the bottom of the muffins. Feel free to customize your muffins by adding nuts, lemon zest, or a sprinkle of cinnamon to the batter for extra flavor. Store any leftover muffins in an airtight container at room temperature for up to 3 days, or freeze them for longer storage. Recipe Card Your feedback is valuable If you try this recipe and love it, I would love if you come back and gave it 5 stars! Thank you so much for visiting Vial Fair Living – we’re so happy you’re here! I would love it if you can share this recipe using the social media buttons you see next to the post. Frequently Asked Questions Accordion Tab Title 1 Click edit button to change this text. Lorem ipsum dolor sit amet, consectetur adipiscing elit. Ut elit tellus, luctus nec ullamcorper mattis, pulvinar dapibus leo. Accordion Tab Title 2 Click edit button to change this text. Lorem ipsum dolor sit amet, consectetur adipiscing elit. Ut elit tellus, luctus nec ullamcorper mattis, pulvinar dapibus leo. Accordion Tab Title 3 Click edit button to change this text. Lorem ipsum dolor sit amet, consectetur adipiscing elit. Ut elit tellus, luctus nec ullamcorper mattis, pulvinar dapibus leo. Leave a ReplyPlease enable JavaScript in your browser to complete this form.Name *Email *Website / URLMessageCheckboxes Yes, add me to your mailing list. Submit Popular Recipes Subscribe Signup for our NewsletterUnlock a world of flavor, creativity, and green living. Subscribe for exclusive recipes, DIY tutorials, and gardening advice.Please enable JavaScript in your browser to complete this form.Name *Email * Submit Popular Recipes
Easy Sourdough English Muffins
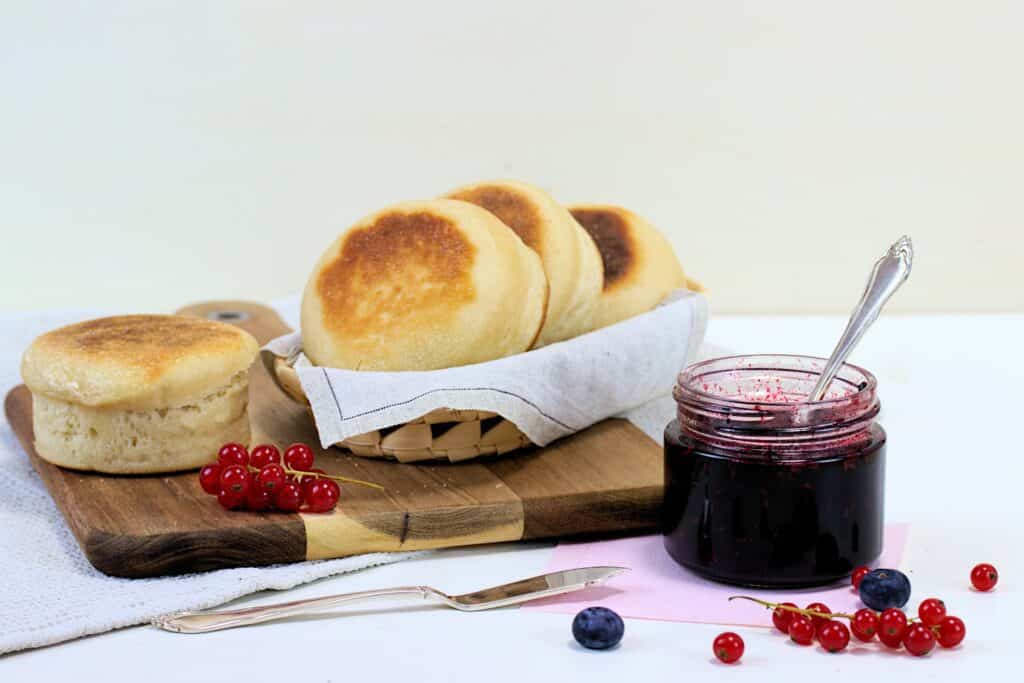
Ingredients Cooking Instructions Jump to Recipe Disclosure: This post contains affiliate links, meaning, at no additional cost to you, we will earn a small commission if you click through and make a purchase. Learn more Home This easy and delicious sourdough English Muffins will easily become your go to recipe for breakfasts. This easy and delicious sourdough English Muffins will easily become your go to recipe for breakfasts. All it requires a little planning and you can make it ahead and these muffins are versatile too. What more you can also use your sourdough discard for this recipe. With the holiday season upon us, I have so many things in my head with all the planning that goes weeks ahead to make this end of the year festivities memorable. So far, I made my Christmas cake and put up all the decorations. I like to make a few things ahead of time and store them in the freezer to avoid last minute stress. And this easy sourdough English muffins fits my schedule. We love its soft and fluffy texture for breakfast and its also easy on your stomach too due to long fermentation. These muffins can also be made to a sandwich. The best part, is that you don’t need much planning or kneading like a traditional sourdough bread. You throw in all the ingredients and let it long ferment and next day make it. You can also start it in the morning and finish it off the same day, depending on the season the temperature of your home. The best part is that its a very flexible recipe and you can’t go wrong with it. A beginner can easily make these muffins. Table of Contents Tools you may need Disclosure: This post contains affiliate links, meaning, at no additional cost to you, we will earn a small commission if you click through and make a purchase. Learn more Large mixing bowl Danish dough hook Rolling pin Muffin Rings Cookie sheets Cast iron skillet Spatula How to make Easy Sourdough English Muffins? Ingredients List Flour: If you want to make soft and fluffy sourdough English muffins, white wheat flour is the best choice. I use spelt flour since about a decade and it works out too. Greek Yogurt – Yogurt adds fat and additional flavor. Moreover, helps the fermentation process. You can also use milk or even normal yogurt. ( I have done with all of them with slight variations.) Baking Soda – Makes the dough fluffier. Add the soda after the bulk ferment only. Honey – I usually substitute honey with sugar. Because heating and baking with honey creates toxins. Cooking Instructions Make the Dough Feed your sourdough starter the day you want to use in the morning so that its nice and bubbly. On the previous night, mix together the starter, half of the flour roughly and yogurt and leave the dough covered overnight. You can refrigerate the dough for long fermentation depending on your schedule. Day 2- Roll out the dough Next day add the remaining flour, salt and baking soda if any and knead until smooth. Roll out on a floured surface to about 1-2 cm in thickness and cut into circles and place them 5 cm apart on a tray sprinkled with semolina or corn flour. Cover and let it rise for 45 min or until they bounce off when you make a dent with your finger. Tip: If you want an even rise, use muffin rings for cutting, and second rise. Cook the muffins with the ring and it will puff up taller. But first grease the rings well with coconut oil. Cook the Muffins Preheat a cast iron skillet over medium-low heat. Add a few drops of coconut oil or any neutral oil and add 3-5 muffins, and cover the skillet with a lid. Cook them for about 5 to 7 minutes, flip them, put the lid back on, and bake them for another 4 minutes or until golden brown on both sides. Cover the lid as the steam will make the muffins cook softer and even. Cook them in batches until they are all done. Cool the Muffins Transfer the muffins to a wire rack to cool. Serving Suggestions Serve them fresh and warm if possible. You can easily toast them in a toaster the next day. We love it toasted too. If you are going to freeze a batch, take them out the night before to thaw, toast and serve. We love to spread butter and a little of our homemade jam for breakfast. Health Benefits of Sourdough Sourdough has many health benefits. The main reason sourdough has gained popularity is due to the probiotic benefit of long fermentation which helps in boosting digestion and gut health. Moreover, it adds to better nutrient absorption in addition to promoting gut health. People with gluten sensitivity can easily digest sourdough bread. Because the anti-nutrients present in grains like phytic acid breaks down during the fermentation making it easily digestible. The fermentation helps to lower the gluten in the grains and its rich in probiotics too. These are some of the benefits of sourdough breads. Take a look at this site to know more about the health benefits of sourdough. These are some of the benefits of sourdough breads. Take a look at this site to know more about the health benefits of sourdough. Recipe Card Your feedback is valuable If you try this recipe and love it, I would love if you come back and gave it 5 stars! Thank you so much for visiting Vial Fair Living – we’re so happy you’re here! I would love it if you can share this recipe using the social media buttons you see next to the post. Frequently Asked Questions Can I mix the dough in my stand mixer? Yes, you can absolutely mix the dough in your stand mixer with the dough hook attachment. But for the previous night, I would just use