Sharing is caring

Homemade Aloe Vera Cream – All Skin Types

Disclosure: This post contains affiliate links, meaning, at no additional cost to you, we will earn a small commission if you click through and make a purchase. Learn more

Our skin is our largest detoxification organ therefore what we put on our skin is absorbed into our body. This affects our skin’s health and body health too. This is why it’s incredibly useful to make your own skin care products. Try making this all natural homemade aloe vera cream for your skin. This body cream uses all natural and nourishing ingredients which is suitable for all skin types.
Homemade aloe vera cream

Since about a year, I have been intending to share this homemade aloe vera cream recipe. I got the recipe from a good friend on mine, therefore I cannot claim all the credit. But as usual since I couldn’t source all the ingredients, so, I modified the recipe. My first attempt of this cream didn’t work out because I didn’t cut the fresh aloe vera right and was a little too impatient. The second attempt it worked like a dream therefore I wanted to share it on my blog.


Table of Contents

Aloe Vera the perfect ingredient for skin care

Aloe vera is one of the most versatile plants in the world. It has a long history of use for medicinal purposes, and it’s still used to treat a variety of conditions. This plant has its origins in North Africa, and it was introduced to Europe in the 16th century. It became popular as a natural remedy for a variety of illnesses. Aloe vera is still used today to treat skin conditions, such as psoriasis and eczema, and it’s also used to treat other conditions, such as diabetes and asthma.


Due to the above and many other properties, Aloe Vera makes an ideal choice for a water based lighter homemade cream.

History of Pepper Jelly

The Origins of Pepper Jelly: Pepper jelly has its roots in Southern United States cuisine, where preserving fruits and vegetables in jellies and jams has been a longstanding tradition. The idea of combining spicy peppers with sweet jellies is thought to have emerged as a way to use up an abundant pepper harvest and create a versatile condiment that could complement a variety of dishes.

Tools you may need

Disclosure: This post contains affiliate links, meaning, at no additional cost to you, we will earn a small commission if you click through and make a purchase. Learn more

How to make Hot and Sweet Pepper Jelly?

Hot and Sweet Pepper Jelly

Ingredients List

  • 1 chopped bell pepper (red or green)
  • 1 cup or 20 finely chopped hot peppers (such as jalapeños, serranos, or habaneros, seeds removed for less heat)
  • 3 cups of pectin sugar
  • 1 cup apple cider vinegar
  • Juice of 1 lemon
  • 1/2 teaspoon salt

Cooking Instructions

  • Prepare the Peppers:

    Wear gloves in order to protect your hands from the heat of the peppers. I have experienced heat on my hands for almost a week because I forgot to wear the gloves once. Remove the stems, seeds, and membranes from the hot peppers (you can leave some seeds if you prefer a spicier jelly). Chop them roughly and then blend it to a rough consistency.

  • Cook the Peppers:

    Combine the blended peppers after filtering out the excess liquid with pectin sugar, apple cider vinegar, and salt in a thick bottom pot or saucepan. Remove the liquid from the crushed peppers, only if you want the jelly to be thicker, otherwise its not needed.

    Bring the mixture to a boil over medium-high heat, then reduce the heat and let it simmer for about 10 minutes.Increase the heat and bring the mixture back to a rolling boil. Boil for 1 minute, stirring constantly.

  • Skim the Foam

    Sponsored Links

    Skim off any foam that forms on the surface of the jelly using a metal spoon. This will help to ensure a clear jelly, if you want a clear jelly.

  • Plate Test

    Prior to starting the jam, keep a plate in the freezer. Then drop a little of the jelly and see if it has attained the required consistency.

  • Canning the Jelly:

    Ladle the hot jelly into sterilized jars, leaving about 1 cm of head space at the top. Wipe the rims of the jars with a clean, damp cloth, and apply the lids and screw bands.

    Process the jars in a boiling water bath for 10 minutes to ensure they are sealed properly. Remove the jars and let them cool completely. Check the seals after 24 hours – the lids should not flex up and down when pressed.

Serving Suggestions

Hot Pepper Jelly is incredibly versatile and can be used in numerous ways:

Cheese Platters: Serve with cream cheese or goat cheese on crackers for a delightful appetizer.
Glaze: Use as a glaze for grilled stuff.
Sandwich Spread: Add to sandwiches or burgers for a sweet and spicy kick.
Condiment: Use as a dip for spring rolls.
Breakfast: Spread on toast, bagels, or scones for a sweet and spicy breakfast treat.

Tips for the Perfect Hot and Sweet Pepper Jelly

Adjusting the Heat: Customize the heat level by adjusting the amount of hot pepper seeds you include.
Consistency: Ensure the jelly sets properly by following the boiling times exactly. If you are using Pectin separately, it needs to boil for the correct amount of time to activate and set the jelly.
Sterilization: Properly sterilize jars and lids to prevent contamination and ensure a long shelf life.

Types of Peppers you can use

While jalapeños are the most commonly used pepper for hot pepper jelly, you can experiment with other types to customize the flavor and heat level:

Jalapeños: Mild to medium heat, widely available.
Serranos: Slightly hotter than jalapeños, with a bright, fresh flavor.
Habaneros: Very hot, with a fruity undertone.
Bell Peppers: No heat, but adds color and sweetness. Mixing different peppers can create a unique balance of flavors and colors.

Flavor Variations of Sweet and Hot Pepper Jelly

Although, the basic recipe is delicious, you can experiment with different ingredients to create unique flavor profiles:

Fruit Additions: Try adding crushed pineapple, mango, or apricots for a fruity twist.
Herbs: Fresh herbs like rosemary or thyme can add an aromatic depth.
Spices: Add a pinch of cinnamon, cloves, or allspice for a warm spicy note.

Health Benefits

Peppers are rich in vitamins A and C, potassium, and fiber. They also contain capsaicin, which has anti-inflammatory properties and can boost metabolism. While the sugar content in the jelly should be enjoyed in moderation, the health benefits of the peppers can still be appreciated. If you are suffering from acidity, its best not to eat spicy food.

Watch the Video

Hot and Sweet Pepper Jelly

Recipe Card

Your feedback is valuable

If you try this recipe and love it, I would love if you come back and gave it 5 stars! Thank you so much for visiting Vital Fair Living – we’re so happy you’re here! I would love it if you can share this recipe using the social media buttons you see next to the post. 

Frequently Asked Questions

Click edit button to change this text. Lorem ipsum dolor sit amet, consectetur adipiscing elit. Ut elit tellus, luctus nec ullamcorper mattis, pulvinar dapibus leo.

Click edit button to change this text. Lorem ipsum dolor sit amet, consectetur adipiscing elit. Ut elit tellus, luctus nec ullamcorper mattis, pulvinar dapibus leo.

Click edit button to change this text. Lorem ipsum dolor sit amet, consectetur adipiscing elit. Ut elit tellus, luctus nec ullamcorper mattis, pulvinar dapibus leo.

Leave a Reply
Subscribe
Signup for our Newsletter
Unlock a world of flavor, creativity, and green living. Subscribe for exclusive recipes, DIY tutorials, and gardening advice.

Our skin is our largest detoxification organ therefore what we put on our skin is absorbed into our body. This affects our skin’s health and body health too. This is why it’s incredibly useful to make your own skin care products. Try making this all natural homemade aloe vera cream for your skin. This body cream uses all natural and nourishing ingredients which is suitable for all skin types.

Since about a year, I have been intending to share this homemade aloe vera cream recipe. I got the recipe from a good friend on mine, therefore I cannot claim all the credit. But as usual since I couldn’t source all the ingredients, so, I modified the recipe. My first attempt of this cream didn’t work out because I didn’t cut the fresh aloe vera right and was a little too impatient. The second attempt it worked like a dream therefore I wanted to share it on my blog.

Homemade aloe vera cream

Aleo Vera the perfect ingredient for skin care

Aloe vera is one of the most versatile plants in the world. It has a long history of use for medicinal purposes, and it’s still used to treat a variety of conditions. This plant has its origins in North Africa, and it was introduced to Europe in the 16th century. It became popular as a natural remedy for a variety of illnesses. Aloe vera is still used today to treat skin conditions, such as psoriasis and eczema, and it’s also used to treat other conditions, such as diabetes and asthma.

Due to the above and many other properties, Aloe Vera makes an ideal choice for a water based lighter homemade cream.

Tips to make Aloe Vera Cream

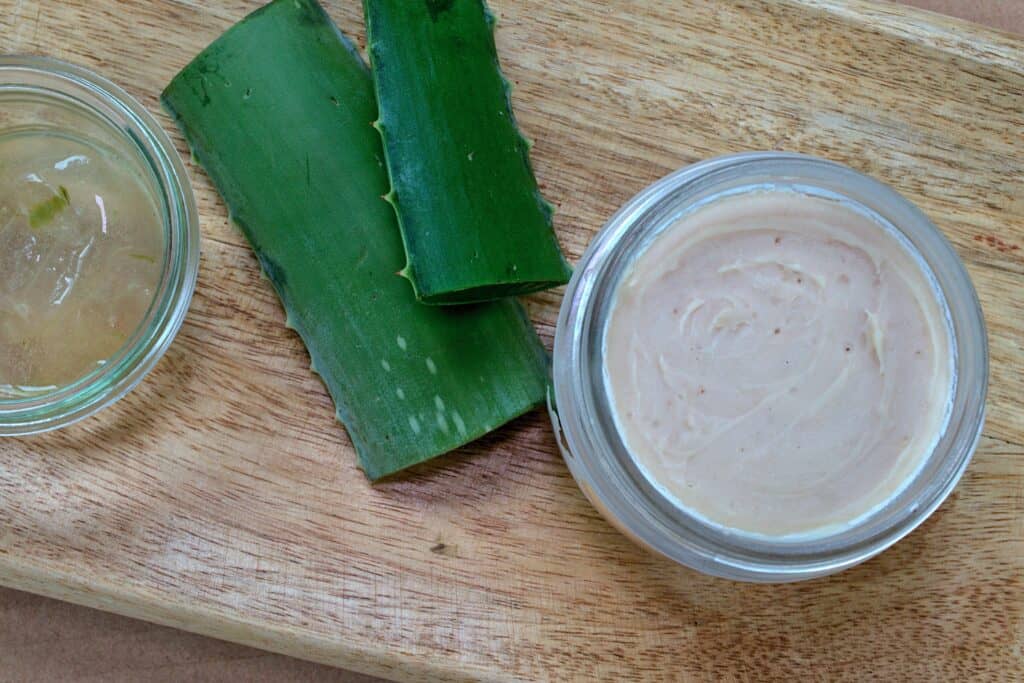
  1. In this recipe, I used aloe gel straight from the leaves of my aloe plant. You can do this by cutting a leaf from the plant and putting a long slit in it with a sharp knife. Then, use a spoon and scoop out the gel.
  2. To avoid permanent damage to your plant, use a sharp knife to cut the leaf, rather than pulling or tearing it off of the aloe plant so that the plant will grow back for later use.
  3. Mix the water based aloe vera and hydrosol mixture slowly into the molten fats so that the cream emulsifies properly.

Homemade Aloe Vera Cream Recipe

You will need

Disclosure: This post contains affiliate links, meaning, at no additional cost to you, we will earn a small commission if you click through and make a purchase. Learn more

8 x 1 oz. (30 ml) glass jars with lids

Labels

Cooking pot

Stainless steel bowl (or double boiler)

Kitchen scale

Immersion blender

Ingredients

½ oz. (14 g) beeswax.

2 oz. (56 g) jojoba wax

1.5 oz. (42 g) coconut oil

1 oz. (28 g) Shea butter

2 oz. (56 g) Aloe Vera gel

1 oz. (28 g) German chamomile hydrosol

15 -20 drops of essentail oils of your choice. ( Rose, Sandal and lavender works well)

Directions to make Homemade Aloe Vera Cream

  1. Melt the beeswax, jojoba, and coconut oils together in a double boiler or in a stainless steel bowl placed over cooking pot partially filled with simmering water.
  2. Add the Shea butter and melt over very low heat so that the Shea butter doesn’t get overheated.
  3. Combine the aloe vera and hydrosol in a separate bowl and blend it well.
  4. After the wax and oils have melted, take the bowl off the heat.
  5. Use the immersion blender and slowly add the aloe and hydrosol mix to the melted wax and oil. Blend until you reach your desired texture. The mixture should emulsify well.
  6. At this stage you can add about 20 drops of essential oils of your choice.
  7. Keep in mind that it will get thicker when it cools, so don’t over mix it or it will be too thick.
  8. Fill the jars with cream.
  9. Store your homemade aloe vera cream in the refrigerator to increase shelf life.

Benefits of Shea Butter in skin care

Shea butter is very moisturising and therefore found in many skin care products. Shea butter is packed with essential nutrients and will enhance your natural complexion and help you glow from the inside out. Raw Shea butter is easy to spread too. There are many benefits for using shea butter in your skin care, below are some of the most important ones.

  • Anti-fungal, anti-bacterial and anti-inflammatory
  • Promotes cell-regeneration
  • Great for all skin types and esp. sensitive skin
  • Very moisturising
  • Can reduce wrinkles, age spots and scars
  • Hydrate and repair damaged skin
  • Great source of fatty acids and vitamins A and E
  • Antioxidant for your skin to reduce signs of ageing
  • Improves skin tone

Because of all the above properties, Shea butter is used on almost all skin types.

Homemade aloe vera cream

Benefits of Bees Wax

The other ingredient I am using is bees wax. Beeswax makes the mixture solid and can be added in small amounts to lotions to achieve a suitable texture to homemade cosmetics. You will need to add just very little.

I usually use bees wax for making lip balms and lipsticks, because, bees wax solidify the natural oils in the mixture quickly. It is the most common raw material for ointments .

If you are allergic to bees wax try using a plant based wax.

Need we say the benefits of coconut oil. Coconut oil is the main ingredient in all of my homemade cosmetics.

If you try this recipe and love it, I would love if you come back and gave it 5 stars! Thank you so much for visiting Vial Fair Living – we’re so happy you’re here! I would love it if you can share this recipe using the social media buttons you see next to the post. 

Homemade Aloe Vera Cream Recipe Card

[penci_recipe]

Pin It

0 0 votes
Article Rating
Subscribe
Notify of
guest
0 Comments
Oldest
Newest Most Voted
Inline Feedbacks
View all comments